

# UV Mapping 3D Models: Complete Beginner Guide
Creating realistic 3D models requires more than just a great shape. The textures, the fine details that give a model its character, are just as important. But how do you get a flat, 2D image to wrap perfectly around a complex 3D object? The answer is UV mapping. This fundamental UV mapping process is a cornerstone of 3D art, used across different software like Blender, Maya, and 3ds Max to bring models to life. Whether you're creating assets for games, films, or architectural visualizations, understanding UV mapping is a crucial skill for any 3D artist.
What is UV Mapping?
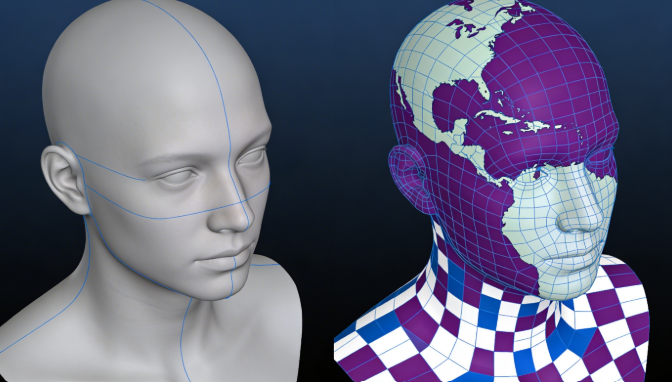
UV mapping is the process of translating a 3D model's surface into a 2D representation, allowing a 2D texture to be wrapped around it. The 'U' and 'V' in the name refer to the axes of the 2D coordinate system, just as X, Y, and Z refer to the axes of the 3D space. Think of it like unwrapping a present. You're taking a 3D object and laying its surface out flat so you can apply a design to it. Without this process, textures would be stretched and distorted, ruining the realism of the model.
How It Works
The process of UV mapping involves a few key steps. A good UV mapping is essential for a realistic model. First, you mark 'seams' on your 3D model. These seams act as cutting lines, indicating where the model should be split to allow it to be flattened. Once the seams are in place, the model is 'unwrapped' into a 2D layout called a UV map. This map is then used as a guide for applying your 2D texture. The 3D software then uses this UV map to project the texture back onto the model, ensuring that it aligns correctly with the model's geometry.
Top Tools for UV Mapping
Choosing the right software for UV mapping can significantly impact your workflow. While many 3D modeling applications have built-in UV editing tools, there are also specialized programs that offer more advanced features. Here's a look at some of the top tools available:
Hyper3D OmniCraft
Hyper3D's OmniCraft is a powerful 3D editing tool that is part of the Hyper3D suite. It offers a streamlined workflow for UV mapping, making it a great choice for both beginners and experienced artists.
- Pros: Intuitive interface, smooth integration with other Hyper3D tools like the AI texture generator, and solid automatic unwrapping features.
- Cons: As a newer tool, it may not have all the advanced features of more established software.
Blender
Blender is a free and open-source 3D creation suite that has become an industry standard. Its UV editing tools are powerful and versatile, making it a popular choice for artists on a budget.
- Pros: Free to use, large and active community, and a comprehensive set of UV mapping tools.
- Cons: The learning curve can be steep for beginners, and the interface can feel less intuitive than some other options.
RizomUV
RizomUV is a dedicated this approach application that is known for its speed and efficiency. It's a favorite among professionals who need to unwrap complex models quickly.
- Pros: Extremely fast and powerful unwrapping algorithms, and a user-friendly interface.
- Cons: It's a specialized tool, so it's not a full 3D modeling package. It also comes with a price tag.
Autodesk Maya
Maya is another industry-standard 3D application that is widely used in the film and game industries. It offers a solid set of this approach tools that are capable of handling even the most complex models.
- Pros: Powerful and flexible UV editing tools, and smooth integration with other Autodesk products.
- Cons: Maya is a professional-grade tool with a professional-grade price tag, and it can be overkill for simpler projects.
My First-Hand Experience
I've had the opportunity to use all of these tools in my own projects. For quick and easy UV mapping, especially when I'm already working within the Hyper3D ecosystem, OmniCraft is my go-to. The automatic unwrapping tools are surprisingly good, and the integration with the AI texture generator is a huge time-saver. When I need more control, I often turn to Blender. It's hard to argue with the power and flexibility you get for free. For a recent project involving a highly detailed character model, I used RizomUV to handle the unwrapping. The speed and efficiency of its algorithms were a lifesaver, and it was well worth the investment. I've also used Maya extensively in professional settings, and its UV tools are top-notch, but I find myself using it less for personal projects due to the cost.
A Step-by-Step Guide to UV Mapping
this approach can seem daunting at first, but it can be broken down into a series of simple steps. Here's a general workflow that you can follow in most 3D modeling software:
1. Prepare Your Model
Before you start the this approach process, make sure your model is clean and ready. This means checking for any issues with the geometry, such as overlapping faces or non-manifold edges. A clean model will make the unwrapping process much smoother.
2. Mark Your Seams
Next, you'll need to mark the seams on your model. Think about where you would naturally find seams on a real-world object. For example, on a shirt, you would find seams along the sides, at the shoulders, and around the sleeves. Placing your seams in these natural locations will help to hide them and make your textures look more realistic.
3. Unwrap the Model
Once your seams are marked, you can unwrap the model. Most 3D software has an automatic unwrapping tool that will do a pretty good job of this. However, you may need to manually adjust the UVs to get the best results. The goal is to lay out the UVs in a way that minimizes distortion and makes the most efficient use of the texture space.
4. Arrange and Optimize the UVs
After the initial unwrap, you'll need to arrange the resulting UV islands in the UV editor. This is like a puzzle, where you want to fit all the pieces together as tightly as possible to maximize the use of your texture. You should also check for any areas where the texture is stretched or compressed and adjust the UVs accordingly. Many artists use a checkerboard pattern to help them spot any distortion.
5. Apply Your Texture
With your UVs laid out, you're ready to apply your texture. You can create your own textures from scratch, or use an AI texture generator to create them for you. You can even use a tool like Hyper3D's image to 3D to generate a 3D model from a single image, which can be a great starting point for your texturing work.
Advanced UV Mapping Tips
Once you have the basics of this approach down, there are a number of advanced techniques you can use to take your UV mapping skills to the next level.
Overlapping UVs
In some cases, you can overlap UVs to save texture space. For example, if you have a symmetrical object, you can unwrap one half and then mirror the UVs for the other half. This can be a great way to increase the texel density of your model, but it can also cause issues with baking and ambient occlusion, so use it with caution.
UDIMs
UDIMs (U-Dimension) are a way of using multiple texture maps for a single model. This is a common technique in the film industry, where models need to have extremely high-resolution textures. By using UDIMs, you can have a separate texture for each part of your model, allowing for an incredible level of detail.
Texel Density
Texel density refers to the amount of texture space that is dedicated to a particular part of your model. For important areas, like a character's face, you'll want to have a higher texel density to ensure that the textures are sharp and detailed. For less important areas, you can get away with a lower texel density. You can learn more about optimizing your models in our guide to 3D model optimization.
FAQ
What is the difference between UV mapping and UV unwrapping?
this approach is the entire process of applying a 2D texture to a 3D model. UV unwrapping is a specific step in that process where you flatten the 3D model's surface into a 2D representation.
Why is UV mapping important for 3D artists?
this approach is crucial because it allows for detailed and realistic texturing. Without it, textures would appear distorted and unrealistic, which would detract from the quality of the 3D model.
How do I fix stretched textures in my UV map?
Stretched textures are a common problem that can be fixed by adjusting the UVs in the UV editor. Using a checkerboard pattern can help you to identify areas of distortion. You can then manually move the UVs to give them more or less texture space as needed.
Can I use multiple textures on one model?
Yes, you can use multiple textures on a single model. This is a common technique for complex models that require a high level of detail. You can use different materials for different parts of the model, or use UDIMs to have multiple high-resolution textures for a single object.
What is the best way to practice UV mapping?
The best way to practice UV mapping is to start with simple objects and work your way up to more complex models. Try unwrapping a variety of different shapes to get a feel for how the tools work. You can also find a wealth of tutorials and resources online to help you along the way. For more tools to help you with your 3D creations, check out the tools page on hyper3d.ai.