

How to Paint 3D Prints: Step-by-Step Guide
Painting your 3D prints can transform them from simple plastic objects into detailed and vibrant creations. Whether you're a hobbyist looking to bring your favorite characters to life or a professional creating prototypes, a good paint job can make all the difference. There are many tools and techniques available, from traditional brush painting to using an AI texture generator to create intricate designs. This guide will walk you through the entire process of how to paint 3d prints, from preparing your print to applying the final touches.
Why Paint Your 3D Prints?
While some 3D prints look great straight off the printer, painting them offers several advantages. A coat of paint can hide layer lines and other imperfections, giving your model a more professional and finished appearance. It also allows you to add a level of detail and realism that's impossible to achieve with colored filament alone. Also, a layer of paint and a sealant can protect your print from UV damage and moisture, extending its lifespan. Tools like AI 3D model generator can help with this.
Essential Supplies for Painting 3D Prints
Before you begin, it's important to gather the right supplies. Having everything on hand will make the process smoother and more enjoyable.
Primers
A good primer is essential for getting a smooth and even paint job. It helps the paint adhere to the plastic and provides a neutral base color to build upon. Look for a primer that is specifically designed for plastics.
Paints
There are several types of paint that work well for 3D prints. Acrylics are a popular choice because they are water-based, easy to clean up, and come in a wide range of colors. Enamels and lacquers are also options, but they are solvent-based and require more ventilation.
Brushes and Airbrushes
A set of quality brushes in various sizes is a must-have for hand-painting. For larger areas or for achieving a very smooth finish, an airbrush is an excellent tool. You don't need the most expensive setup to get started, and a basic airbrush kit can be a great investment.
Sandpaper and Fillers
To get a truly smooth surface, you'll need to do some sanding. A variety of sandpaper grits, from coarse to fine, will help you remove layer lines and blemishes. For larger gaps or imperfections, a plastic filler or putty can be used.
Sealants and Finishes
Once you're finished painting, a sealant will protect your work and give it a consistent finish. Sealants come in matte, satin, and gloss finishes, so you can choose the one that best suits your project.
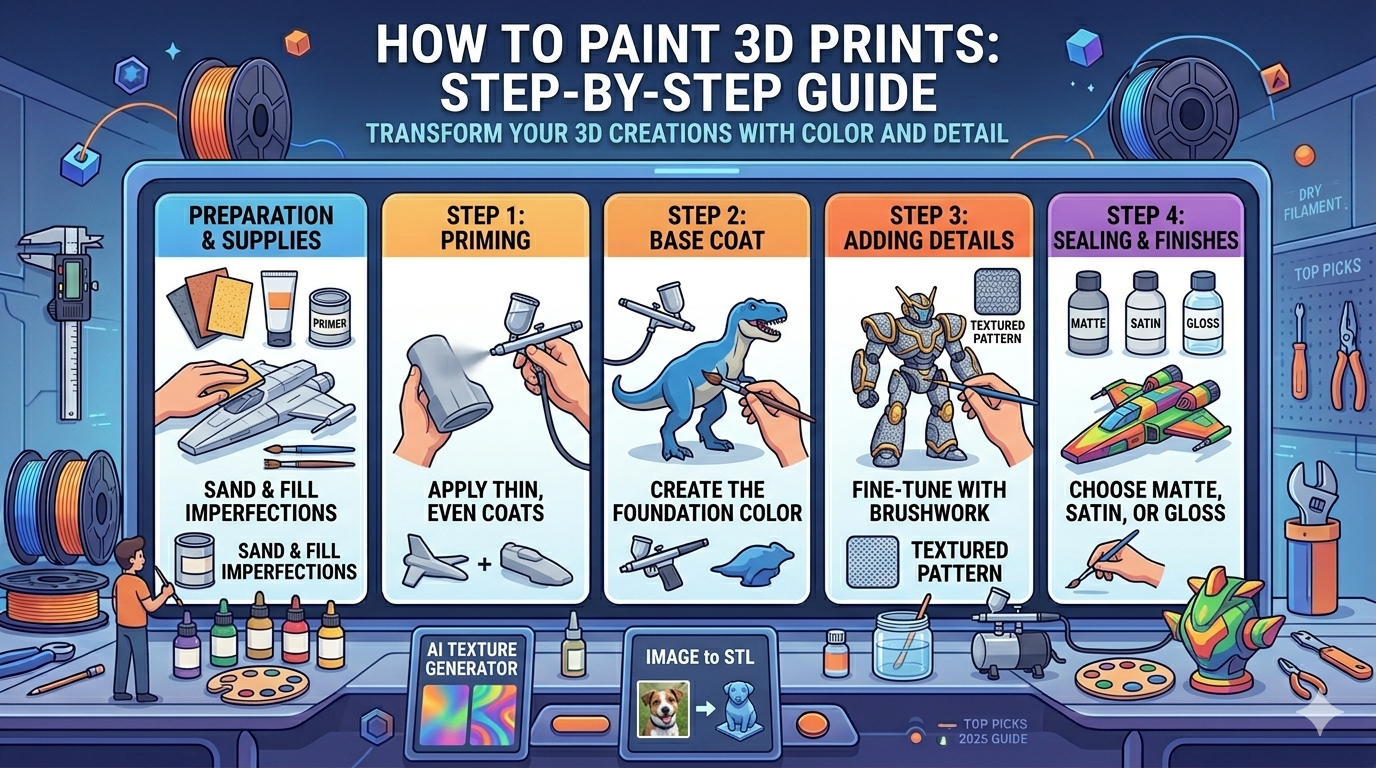
How to Paint 3D Prints: A Step-by-Step Guide
Now that you have your supplies, it's time to start painting. Following these steps will help you achieve a professional-looking result.
Step 1: Preparing Your 3D Print for Painting
Proper preparation is the key to a great paint job. Start by removing any support material from your print. Then, use sandpaper to smooth out the surface, paying close attention to any rough spots or layer lines. If there are any gaps or cracks, use a filler to create a smooth surface. Once you're happy with the smoothness of your print, clean it with soap and water to remove any dust or oils.
Step 2: Priming Your 3D Print
Once your print is clean and dry, it's time to prime. Apply a thin, even coat of primer to the entire surface of your model. It's better to apply several thin coats than one thick coat, as this will help you avoid obscuring any details. Let the primer dry completely before moving on to the next step.
Step 3: Applying the Base Coat
With your model primed, you can now apply the base coat. This is the main color of your print. Whether you're using a brush or an airbrush, apply the paint in thin, even coats. Let each coat dry before applying the next one. This will help you achieve a smooth, opaque finish.
Step 4: Adding Details and Colors
This is where your model really starts to come to life. Use smaller brushes to add details and different colors. Don't be afraid to experiment with different techniques, such as layering and blending. For creating complex models with intricate details to paint, consider using an AI 3D model generator.
Step 5: Weathering and Special Effects (Optional)
If you want to give your model a more realistic or worn look, you can add weathering effects. Techniques like washes, which involve applying a thinned-down paint to settle into the crevices, and dry brushing, which involves using a brush with very little paint to highlight the raised areas, can add a lot of depth and character to your print.
Step 6: Sealing Your Painted 3D Print
Once you're happy with your paint job, it's time to seal it. Apply a clear sealant to protect the paint and give your model a finished look. Choose a finish that complements your project, whether it's a flat matte, a slight sheen with satin, or a shiny gloss.
My First-Hand Experience: Painting a Model from an Image to STL Conversion
I recently wanted to create a unique gift for a friend, a small statue of their beloved pet. I started with a photo and used an image to STL converter to generate a 3D model. The initial model was a bit rough, so I used a 3D format converter to get it into a format I could easily edit. After some minor tweaks, I printed it. The real fun began with the painting process. I followed the steps I've outlined here, starting with sanding and priming. I used acrylic paints and a combination of hand-brushing for the fine details and an airbrush for the base coat. The most challenging part was getting the fur texture just right. I used a dry brushing technique with a few different shades of brown and it turned out great. The final result was a personalized and hand-painted model that my friend loved.
Advanced Techniques for How to Paint 3D Prints
Once you've mastered the basics, you can explore more advanced painting techniques to take your 3D prints to the next level.
Airbrushing for a Professional Finish
An airbrush can help you achieve a smooth, professional-looking finish that's difficult to get with a brush. It's great for applying base coats, creating gradients, and blending colors. There's a bit of a learning curve, but the results are well worth the effort.
Using Masks and Stencils
For creating sharp lines and intricate patterns, masking tape and stencils are invaluable tools. You can use them to block off areas of your model that you don't want to paint, allowing you to create clean, precise designs.
Creating Realistic Textures
There are many techniques for creating realistic textures on your 3D prints. You can use a stippling motion with a brush to create a rough texture, or you can use special texture paints. Experimenting with different materials and techniques is the key to finding what works best for you.
Objective Comparison: Hand-Painting vs. Airbrushing
| Feature | Hand-Painting | Airbrushing |
|---|---|---|
| Control | Excellent for fine details | Good for smooth, even coats |
| Speed | Slower, especially for large areas | Faster for base coats and large surfaces |
| Finish | Can show brush strokes | Smooth, professional finish |
| Cost | Low initial cost | Higher initial investment |
| Learning Curve | Easy to get started | Steeper learning curve |
Ultimately, the best method depends on your project and personal preference. Hand-painting is great for detailed work, while airbrushing excels at creating smooth, even finishes on larger surfaces. Many artists use a combination of both techniques.
How to Paint 3D Prints: Frequently Asked Questions (FAQ)
What is the best paint for 3D prints?
Acrylic paints are generally the best choice for beginners as they are easy to use and clean up. However, enamels and lacquers can also be used for a more durable finish.
Do I need to prime my 3D prints before painting?
Yes, priming is a crucial step. It helps the paint adhere to the plastic and creates a smooth, even surface to work on.
How do I get a smooth finish on my painted 3D prints?
To get a smooth finish, you need to properly prepare your print by sanding and filling any imperfections. Applying thin, even coats of primer and paint is also essential.
Can I paint flexible 3D prints?
Yes, you can paint flexible 3D prints, but you'll need to use a flexible paint and primer to prevent the paint from cracking when the print is bent.
How long should I wait for the paint to dry on a 3D print?
The drying time will vary depending on the type of paint you're using and the thickness of the coats. It's always best to let each coat dry completely before applying the next one.
Conclusion
Painting your 3D prints is a rewarding process that can elevate your creations to a new level. With the right supplies and techniques, you can turn a simple plastic model into a work of art. Don't be afraid to experiment and find what works best for you. If you're looking for your next project, consider using a 3D printing model generator to create a custom model to paint.