

Image to 3D: Complete AI Photo-to-3D Guide 2026
Turning a flat photo into a 3D model used to mean hours of painstaking manual work — tracing references, sculpting geometry by hand, painting textures pixel by pixel. If you weren't a trained 3D artist, it simply wasn't an option. That's no longer the case. Image to 3D tools powered by AI can now take a single photograph and produce a textured, downloadable 3D model in seconds.
This isn't just a novelty. Game developers use it to turn concept art into playable assets. E-commerce brands use it to build interactive product views from catalog photos. 3D printing hobbyists use it to skip the modeling step entirely. If you work with 3D in any capacity, knowing how image to 3D conversion works — and which tools do it best — is worth your time.
This guide covers the technology, the tools, and the practical steps to get great results.
What is Image to 3D Conversion and How Does It Work?
Image to 3D conversion takes a 2D picture and uses AI to figure out the depth, shape, and surface details needed to build a full 3D model from it. You upload a photo, and the software handles everything else — no manual modeling required.
The Technology Behind AI-Powered 3D Generation
Under the hood, these tools rely on machine learning models trained on massive datasets of 3D objects. When you upload an image, the AI looks at lighting, shadows, edges, and perspective to understand the shape of the object. Then it predicts what the parts you can't see — the back, the bottom, the sides — probably look like, and builds geometry to match.
The main approaches include Neural Radiance Fields (NeRFs), which are great at capturing fine detail, Large Reconstruction Models (LRMs) that use transformer architectures for fast and consistent output, and diffusion models adapted from 2D image generation. Most modern platforms blend several of these techniques together.
From Pixels to Polygons: The Short Version
Here's the simplified version: the AI reads the color and shape information from your flat image, builds a 3D mesh (the wireframe structure), and then wraps the color data around it as a texture. The result is a complete 3D object that looks like the thing in your photo, viewable from any angle and ready to drop into a game engine, a website, or a 3D printer.
Top AI Tools for Image to 3D Conversion in 2026
There's no shortage of options, but they're not all built for the same audience. Different tools handle geometry, texturing, and topology in completely different ways. Here is an honest breakdown of the top tools and who they are actually built for.
Meshy AI: Best for Texturing Workflows
Meshy is highly regarded for its texturing capabilities. When you convert an image to 3D, getting the surface details right is half the battle, and Meshy excels here.
- Pros: It offers a very polished, intuitive interface and produces some of the best textures in the space. It handles stylized and low-poly aesthetics particularly well.
- Cons: When dealing with complex geometry from a single image, the resulting mesh can sometimes be lower quality or "rougher" than competitors. It also tends to cost slightly more per generation.
- Best for: Artists who want great textures out of the box and don't mind doing a little manual cleanup on the geometry later.
Tripo AI: Best for Game Development Pipelines
Tripo is built with technical artists in mind, focusing heavily on getting assets ready for game engines.
- Pros: It is incredibly fast and outputs clean, pipeline-ready files. It includes built-in auto-rigging for characters, which is a massive time-saver.
- Cons: Some users in the 3D printing community note that its STL exports can sometimes have weird normals, making it slightly less reliable for physical fabrication compared to digital use.
- Best for: Game developers who need to turn 2D concept art into rigged, engine-ready 3D assets quickly.
Hyper3D (Rodin): Best for Multi-View Accuracy and Topology
Hyper3D runs on the Rodin Gen-2 engine and takes a different approach by focusing heavily on mesh quality and a unified workspace.
- Pros: The Image-to-3D generator produces very clean, sharp geometry. It handles multi-view inputs exceptionally well — if you upload photos from different angles, it stitches them together without requiring exact camera calibration. The built-in OmniCraft suite lets you use the AI Texture Generator and GLTF Viewer to refine the model in the browser.
- Cons: Its high-fidelity focus means it can be overkill (and sometimes slower) if you just need a quick, low-poly background prop where structural perfection doesn't matter.
- Best for: Creators who need accurate geometry from multiple photos, high-quality character avatars, or those who want an all-in-one ecosystem for generating and editing.
Tencent Hunyuan3D: Best Free/Budget Option
Hunyuan3D has gained a lot of traction recently as a powerful, budget-friendly alternative.
- Pros: It offers 20 free generations per day and produces surprisingly high-quality models that rival paid tools.
- Cons: The interface is primarily in Chinese (requiring browser auto-translate), it doesn't work well on mobile, and complex objects often need to be broken down into pieces for the best results.
- Best for: Hobbyists and budget-conscious creators willing to navigate a translated interface in exchange for high-quality free generations.
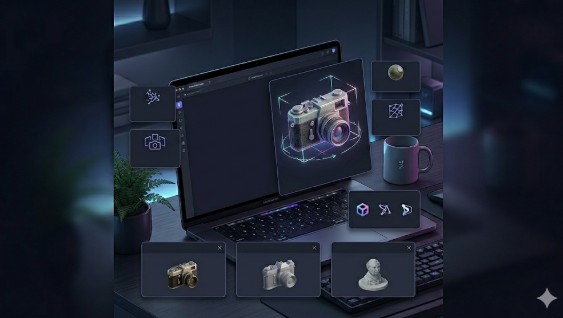
My First-Hand Experience with Rodin Image-to-3D
To see how well this actually works, I recently tested Hyper3D's image-to-3D feature using a photo of a vintage camera. The interface is incredibly straightforward — just a clean, dark workspace with a central upload area. I dragged my photo in, left the mode on "Default," and hit generate.
What impressed me wasn't just the speed, but how the AI handled the parts of the camera that weren't visible in the photo. It accurately guessed the shape of the back casing and the depth of the lens barrel. Later, I tried the multi-view option with a few different angles of a ceramic vase. Because the system is "pose-free," I didn't have to worry about exact camera angles or calibration; I just uploaded the photos, and the Rodin engine stitched them together into a remarkably clean mesh with no weird artifacts on the hidden sides. The fact that I could preview the final GLTF file right there in the browser before exporting it to Blender saved me a lot of back-and-forth.
A Step-by-Step Guide to Creating Your First Image to 3D Model
The process is simple, but a few small choices make a big difference in the quality of your output.
Choosing the Right Image
Not every photo works equally well. Here's what to aim for:
- Even lighting. Avoid harsh shadows or blown-out highlights. Flat, diffused light gives the AI the clearest read on surface detail.
- Clean background. A plain white or neutral backdrop helps the AI separate the object from everything else. Busy backgrounds create confusion.
- Full visibility. Make sure the entire object is in frame, nothing cropped or hidden behind other things. The more the AI can see, the less it has to guess.
- Good resolution. Higher-resolution images give the AI more detail to work with, which shows up in sharper textures and more accurate geometry.
Using the Tool
With Hyper3D, the workflow is fast. Upload your image, pick a generation mode (Default for balanced results, Speedy for quick drafts, Focal for detail-heavy objects), and hit generate. The Rodin Gen-2 engine processes the image and delivers a textured 3D model in the interactive viewer within seconds.
If you have photos from multiple angles, use the multi-view mode. It's pose-free — meaning your photos don't need to be taken from exact predetermined positions — and the extra reference data noticeably improves the reconstruction.
Exporting Your Model
Once you're happy with the result, export it in whatever format your project needs. Building an AR experience for iPhone? Go with USDZ, or use the GLB-to-USDZ converter. Sending it to a 3D printer? The Image-to-STL converter has you covered. For game development, FBX and OBJ are the standard choices for Unity and Unreal Engine.
Beyond the Basics: Advanced Image to 3D Techniques
Once you're comfortable with the basics, there are several ways to push the quality further.
PBR Textures and Realistic Materials
The texture that comes out of the initial generation is usually decent, but applying PBR materials takes things to another level. PBR simulates how real-world surfaces interact with light — the way metal reflects differently than wood, or how glass refracts. Hyper3D's AI Texture Generator can create these material maps automatically, saving you the tedious work of painting them by hand.
Cleaning Up the Mesh
AI-generated meshes sometimes come out denser than they need to be, or with uneven polygon distribution. For real-time applications like games or interactive web experiences, you'll want to optimize. Hyper3D includes remeshing tools and a Smart Low-poly feature that produces clean, artist-quality topology — reducing polygon count without losing the visual detail that matters.
Multi-View Input for Better Accuracy
For objects where one photo isn't enough — anything with complex geometry or important details on the back — multi-view input is the way to go. Upload photos from several angles, and the AI has much more information to work with. The result is tighter geometry and fewer artifacts on the sides the camera didn't directly capture.
Frequently Asked Questions (FAQ)
What is image to 3D?
It's a process where AI analyzes a 2D photo and builds a three-dimensional model from it — complete with geometry and textures. You upload a picture to a tool like Hyper3D, Meshy, or Tripo, and the AI handles the rest.
How do I convert an image to a 3D model?
Upload a clear, well-lit photo to a platform like Hyper3D, Meshy, or Tripo. The AI processes the image and gives you a 3D model you can download in formats like STL, FBX, OBJ, GLB, or USDZ. For the best results, use a photo with even lighting and a clean background.
Do I need 3D modeling experience or special software?
No. Most of these tools are built for everyone. They run in your browser, require no downloads, and don't assume any prior 3D knowledge. That said, having basic familiarity with 3D concepts will help you get better results and make smarter choices during the editing and export steps.
What images work best for image to 3D conversion?
Sharp, well-lit photos with clean backgrounds. Avoid heavy shadows, motion blur, or partially hidden objects. Higher resolution generally means better results.
What 3D file formats can I export?
Hyper3D supports STL, FBX, OBJ, GLB, and USDZ — covering 3D printing, game engines, AR apps, and professional 3D software.
Can I use the 3D models for commercial projects?
Yes. Hyper3D, Meshy, Tripo, and most other paid platforms allow commercial use of generated models — for games, marketing, product pages, and more. Always double-check the licensing terms for your specific platform, as free tiers may have different restrictions than paid plans.