

How to Texture 3D Models with AI: Complete Workflow
Texturing is the crucial process of adding color, detail, and surface properties to a 3D model, transforming it from a plain mesh into a realistic or stylized asset. It?? what makes a dragon?? scales look rough and ancient or a spaceship?? hull appear metallic and weathered. For years, this was a highly technical, manual process requiring specialized software and artistic skill. But as with many areas of 3D design, artificial intelligence is changing the game, offering faster and more accessible workflows.
This is where how to texture 3d models tools really show their value.
Whether you??e a seasoned 3D artist or a beginner just starting, understanding the different approaches to texturing is key. Traditional methods used by AAA game studios, like those in Substance Painter, offer incredible control but come with a steep learning curve. On the other hand, new AI texture generator tools from platforms like Hyper3D, Meshy, and others can create stunning results from a simple text prompt. This article explores both worlds, giving you a complete overview of how to texture 3D models for any project.
What is 3D Texturing and How Does It Work? with How To Texture 3D Models
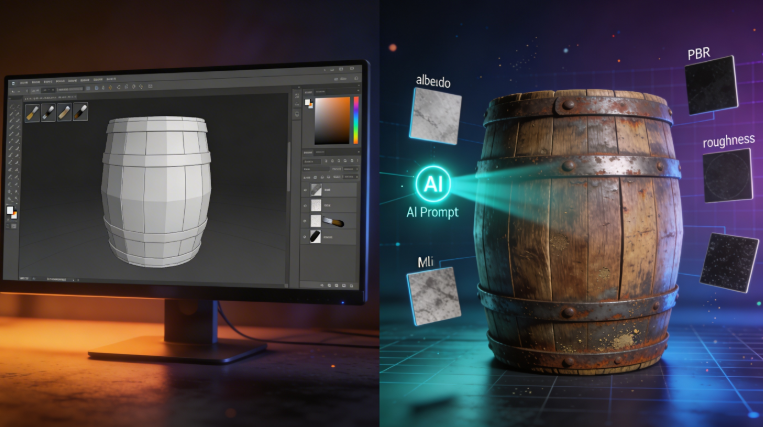
3D texturing is the process of applying a 2D image, known as a texture map, to the surface of a 3D model. This map dictates the model's color, patterns, and material properties. To understand how it works, we first need to cover two core concepts: UV mapping and material channels.
For anyone exploring how to texture 3d models options, this matters.
H3: The Role of UV Mapping
Imagine you want to wrap a gift. You start with a flat piece of wrapping paper (the 2D texture) and wrap it around a box (the 3D model). UV mapping is the digital equivalent of this. It's the process of "unwrapping" a 3D model's surface into a 2D plane, creating a UV map. This map tells the 3D software exactly how to apply the texture image onto the model. Each point (vertex) on the 2D map corresponds to a vertex on the 3D model, ensuring the texture is applied without distortion.
The how to texture 3d models workflow makes this straightforward.
H3: Understanding PBR Material Channels
Modern 3D assets use Physically-Based Rendering (PBR) to simulate how light interacts with a surface in the real world. This is achieved through a set of texture maps, or channels, that control different material properties:
That's a key advantage of modern how to texture 3d models technology.
- Albedo (or Base Color): The pure color of the surface, without any lighting or shadow information.
- Normal Map: Adds the illusion of surface detail (like bumps, scratches, or pores) without adding more polygons to the model.
- Roughness Map: Controls how rough or smooth a surface is. A high roughness value creates a matte, diffuse look, while a low value creates a shiny, reflective surface.
- Metallic Map: Determines whether a surface is a metal or a non-metal (dielectric). This affects how it reflects light.
- Ambient Occlusion (AO) Map: Simulates the soft, ambient shadows that appear in the crevices and corners of a model, adding depth and realism.
Top 3D Texturing Tools Compared
Choosing the right texturing tool depends entirely on your project needs, budget, and technical skill. The landscape includes powerful traditional software that offers maximum control, as well as new AI-driven platforms that prioritize speed and ease of use. Here?? a comparison of the leading options.
| Tool | Best For | Top Strength | Key Limitation |
|---|---|---|---|
| Substance Painter | Professional Control | Unmatched detail & realism | Steep learning curve & cost |
| Quixel Mixer | Photorealistic Surfaces | Megascans library integration | Less versatile for stylized art |
| Hyper3D | All-in-One AI Workflow | Clean geometry & texturing | More focused on realistic assets |
| Meshy AI | AI Texturing & UX | Best AI-powered texturing | Geometry can be rough |
| Tripo AI | Game Dev Pipelines | Fast generation & auto-rigging | Less refined texture quality |
Traditional Texturing Powerhouses
H3: Adobe Substance Painter
Substance Painter is the undisputed industry standard for 3D texturing in game development and VFX. It uses a layer-based painting system that feels intuitive for anyone familiar with Photoshop, allowing artists to paint directly onto the 3D model. It offers a massive library of smart materials and procedural tools to create hyper-realistic surfaces.
- Pros: Unparalleled control over every detail, non-destructive workflow, vast material libraries.
- Cons: Can be expensive (subscription-based), steep learning curve for beginners.
- Best for: Professional 3D artists and studios that require the highest level of detail and control.
H3: Quixel Mixer
Part of the Epic Games ecosystem, Quixel Mixer is a powerful tool focused on creating photorealistic materials by blending scans from the massive Megascans library. It?? a fantastic way to quickly create realistic surfaces for environments and props. Its integration with Unreal Engine is a major plus for game developers.
- Pros: Seamless access to the high-quality Megascans library, intuitive blending workflow, free for use with Unreal Engine.
- Cons: More focused on realism and can be less flexible for hand-painted or stylized looks.
- Best for: Environment artists and Unreal Engine developers aiming for photorealism.
The New Wave: AI Texture Generators
H3: Hyper3D (AI Texture Generator)
Hyper3D isn?? just a model generator; it?? a full ecosystem. Its integrated AI Texture Generator is a key part of its OmniCraft suite, allowing you to take a generated model and instantly apply high-quality PBR materials from a text prompt. This creates a seamless workflow from idea to fully textured asset without ever leaving the browser.
- Pros: All-in-one workflow (generate, texture, export), produces clean topology, excellent for realistic characters and objects.
- Cons: The texturing AI is geared more toward realism, so highly stylized results can be less predictable.
- Best for: Users who want a single, integrated platform to go from a text or image to 3D and get a fully textured, production-ready model.
H3: Meshy AI
Meshy is widely recognized for having one of the most advanced AI texturing engines on the market. It excels at interpreting text prompts to generate beautiful and complex PBR materials. While its geometry generation can sometimes be less refined than competitors, its texturing capabilities are top-tier, making it a go-to for artists who want to re-texture existing models.
- Pros: Best-in-class AI texturing quality, polished user interface, great style library.
- Cons: Generated mesh geometry can be rough and may require cleanup.
- Best for: Artists who need to quickly apply high-quality, AI-generated textures to existing 3D models.
H3: Tripo AI
Tripo AI is built for speed and game development pipelines. It generates models very quickly and includes features like auto-rigging, which is a huge time-saver. While its texturing is fast, it may not have the same level of detail or refinement as more specialized tools like Meshy or Hyper3D.
- Pros: Extremely fast generation, built-in auto-rigging, generous free tier.
- Cons: Texture quality can be less detailed compared to others, some export formats can have issues.
- Best for: Game developers and hobbyists who need to prototype assets quickly and value pipeline-ready features.
My First-Hand Experience with Hyper3D?? AI Texture Generator
To see how the AI texturing workflow feels in practice, I took Hyper3D?? Rodin platform for a spin. My goal was to create a simple object and then texture it using the integrated AI Texture Generator. I started by generating a model from a text prompt: "a weathered wooden treasure chest, slightly open."
After a few seconds in ??efault??mode, the model appeared in the dark-themed workspace. The geometry was impressively clean. On the right-hand side, I located the OmniCraft sidebar, which contains all the post-processing tools. I clicked on the AI Texture Generator icon, which opened a simple interface: a text field for my prompt and a ??enerate??button.
I entered the prompt: "old, weathered wood with rusty iron fittings." I hit GENERATE. The process was fast, taking about 15-20 seconds. The result was a full set of PBR textures applied directly to the model. The wood had a convincing grain with subtle color variations, and the iron parts had a nice, dull metallic sheen with patches of rust. I was able to rotate the model in the built-in GLTF Viewer to inspect the texture from all angles. The workflow was incredibly smooth, going from a basic model to a fully textured asset in under a minute without leaving the application.
A Step-by-Step AI Texturing Workflow
Texturing a 3D model using an AI-powered tool like Hyper3D is a straightforward process. Here?? a typical workflow you can follow:
Step 1: Prepare Your 3D Model
You can either generate a model directly within a platform like Hyper3D or import an existing one. If you??e importing, make sure your model is in a common format like OBJ, FBX, or GLB and has been properly UV unwrapped. Most AI generators work best with clean, manifold geometry.
Step 2: Access the AI Texture Generator
In Hyper3D, this tool is part of the OmniCraft suite in the Rodin editor. For other platforms like Meshy, you??l upload your model and navigate to their texturing module. The interface is typically minimal, focusing on a text prompt area.
Step 3: Write a Descriptive Text Prompt
This is where the magic happens. Your prompt is the primary input that guides the AI. Be specific and descriptive. Instead of ??ood texture,??try ??ark oak wood with a glossy finish and fine grain.??Include details about material, color, condition, and style.
- Good Prompt Example: ?? medieval shield made of hammered iron with gold filigree and a worn leather strap.??* Bad Prompt Example: ??hield texture.??
Step 4: Generate and Iterate
Hit the generate button and wait for the AI to process your request. The tool will create a full set of PBR texture maps and apply them to your model. Review the result in the 3D viewer. If it?? not quite right, refine your prompt and try again. You might try adding more specific adjectives or changing the style you??e aiming for.
Step 5: Export Your Textured Model
Once you??e happy with the result, you can export the model. Hyper3D offers several standard formats, including GLB, FBX, and USDZ, which are ready for use in game engines, 3D software, or AR applications. The exported package will contain the 3D model along with all the generated texture maps.
Use Cases and Applications
AI-powered texturing is not just a novelty; it has practical applications across various industries, streamlining workflows and unlocking new creative possibilities.
- Game Development: Quickly create unique textures for props, environments, and characters, saving hours of manual work. Indie developers can produce high-quality assets without a dedicated texture artist.
- Prototyping and Concept Art: Rapidly visualize ideas and iterate on the look and feel of a product or character. An AI art generator can provide inspiration for textures.
- VFX and Animation: Generate detailed surfaces for digital doubles, creatures, and environments in films and animated shorts.
- AR/VR Experiences: Create lightweight, realistic assets for immersive applications where performance is key. A GLB to USDZ converter can be useful for this.
- 3D Printing: While many 3D prints are single-color, texturing can be used to create colored renders for presentation or to apply textures for full-color 3D printing.
FAQ about 3D Model Texturing
H3: What is the easiest way to texture a 3D model for a beginner?
For a complete beginner, the easiest way is to use an all-in-one AI platform like Hyper3D. The integrated workflow allows you to generate a model and then immediately apply textures with a simple text prompt, all within the same interface. This removes the technical hurdles of UV mapping and manual painting.
H3: Can I use AI to re-texture an existing 3D model?
Yes. Tools like Meshy AI are excellent for this. You can upload a model you already have, and their AI texturing engine will generate and apply new PBR materials based on your text prompt. This is a great way to quickly give old assets a fresh look.
H3: Do I need to know how to UV unwrap to use AI texture generators?
For most AI texturing platforms, you do not need to manually UV unwrap. The software typically handles the UV mapping process automatically. However, for traditional software like Substance Painter, understanding how to create clean UVs is a fundamental and necessary skill.
H3: What is the best free 3D texturing software?
For traditional, manual texturing, Quixel Mixer is a fantastic free option, especially for creating realistic surfaces for use in Unreal Engine. If you are looking for free AI generation, Tripo AI offers a generous number of free credits to get started.
H3: How to texture 3d models for games?
For game development, the workflow usually involves creating optimized, low-polygon models and efficient PBR textures. A common pipeline is to model in Blender or Maya, then texture in Substance Painter for maximum control. Alternatively, an AI tool like Tripo AI can be great for quickly generating game-ready assets with its auto-rigging features.