3D Text Prompt Guide: How to Write Prompts for AI 3D Generation
Learning to communicate with AI is the most important skill for creators right now. Whether you're generating images, video, or 3D models, the quality of your output depends almost entirely on the quality of your input. For text-to-3D model generators, a well-crafted prompt is the difference between a lumpy, unusable mesh and a clean, detailed asset you can drop directly into your project. While every platform from Tripo AI to Hyper3D has its own nuances, the core principles of effective prompting are universal.
This is where 3d text prompt guide tools really show their value.
This guide breaks down how to write effective prompts for any AI 3D generation tool. We'll cover the fundamental structure of a good prompt, explore how different tools interpret them, and provide a step-by-step workflow for turning your text ideas into tangible 3D assets. We'll also offer some first-hand experience from testing these tools, so you can see how prompts translate to actual results.
For anyone exploring 3d text prompt guide options, this matters.
3D Text Prompt Guide: What is a 3D Text Prompt?
A 3D text prompt is a set of instructions you give to an AI model to describe the 3D object you want to create. It's more than just a simple description; it's a recipe that guides the AI's creative process. A good prompt typically includes several key components that work together to define the final model.
The 3d text prompt guide workflow makes this straightforward.
Core Subject
This is the most basic part of the prompt??he "what." It should be a clear and concise noun phrase that identifies the object. For example, `a rusty metal barrel`, `a cartoon-style treasure chest`, or `a photorealistic leather armchair`.
That's a key advantage of modern 3d text prompt guide technology.
Descriptive Modifiers
Modifiers add detail and context. These are the adjectives and phrases that specify the object's appearance, material, and style. Think about texture, color, and condition. For instance, instead of just `a sword`, you might write `a weathered steel longsword with a worn leather-wrapped hilt`.
When it comes to 3d text prompt guide, the details matter.
Style and Art Direction
This is where you define the overall aesthetic. Do you want something realistic, or stylized? Use keywords that point the AI toward a specific artistic style. Examples include `low-poly`, `voxel art`, `cyberpunk`, `fantasy`, `sci-fi`, or even naming specific artists like `in the style of Ghibli`.
A good 3d text prompt guide tool handles this automatically.
Top AI 3D Generation Tools Compared
Nearly every major player in the generative AI space has a text-to-3D tool, but they don't all excel at the same tasks. Some are built for speed and rapid prototyping, while others prioritize clean geometry for production workflows. Here?? a look at how the top tools stack up and what they are best for.
This is one area where 3d text prompt guide has improved significantly.
Meshy AI
Meshy has a reputation for its excellent texturing capabilities and a very polished, user-friendly interface. If your priority is creating a model that looks great right out of the box, Meshy is a strong contender.
- Pros: Best-in-class texturing engine, intuitive UI, great library of styles (voxel, low-poly).
- Cons: The underlying geometry can be somewhat rough on more complex objects, and it can be slightly more expensive per generation compared to others.
- Best for: Texturing and achieving a polished look with minimal effort.
Tripo AI
Tripo AI is a favorite among game developers, and for good reason. It's incredibly fast and includes features like auto-rigging and segmentation that are critical for game development pipelines.
- Pros: Very fast generation, built-in auto-rigging, generous free credits.
- Cons: STL exports can sometimes have issues with normals, and it's less specialized for creating realistic human avatars.
- Best for: Game developers who need pipeline-ready assets quickly.
Hyper3D (Rodin)
Hyper3D's Rodin engine is known for producing exceptionally clean topology, making it a go-to for character artists and anyone who needs a model that's ready for further editing or animation. Its all-in-one ecosystem is also a major plus.
- Pros: Produces the cleanest geometry and topology, especially for characters; the OmniCraft suite provides an in-browser workflow for texturing, editing, and exporting; strong multi-view support.
- Cons: It's more specialized toward characters and avatars, so it can feel less versatile for stylized or abstract props.
- Best for: Clean topology, character avatars, and an all-in-one workflow.
Luma AI (Genie)
Luma AI's Genie is all about speed. It's fantastic for rapid prototyping and getting a visual concept out of your head and onto the screen in seconds. However, the output is not typically production-ready.
- Pros: Extremely fast, making it great for early-stage ideation and concept sketches.
- Cons: The topology is often described as "triangle soup" and requires significant cleanup in a tool like Blender.
- Best for: Rapid prototyping and concept sketching.
| Tool | Best For | Top Strength | Key Limitation |
|---|---|---|---|
| Meshy AI | Texturing & UX | Best textures | Rougher geometry |
| Tripo AI | Game dev pipelines | Auto-rigging | STL export issues |
| Hyper3D | Topology & ecosystem | Cleanest geometry | Less versatile for stylized |
| Luma AI | Rapid prototyping | Speed | Triangle soup topology |
My First-Hand Experience with Hyper3D Rodin
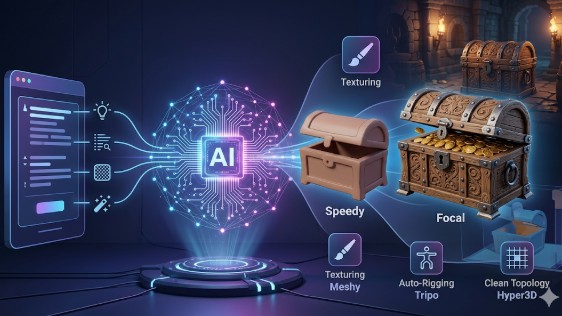
To see how prompts work in a real-world tool, I took the Rodin AI 3D generator for a spin. The interface is clean, with a prominent text input bar at the bottom and generation settings in a right-hand sidebar. I decided to test a moderately complex prompt: `a detailed, ornate fantasy treasure chest, ancient wood with iron fittings, slightly open with gold coins spilling out, low-poly style`.
I ran this prompt through two of Rodin's generation modes: Speedy and Focal.
- Speedy Mode: As the name implies, this was fast. Within about 20 seconds, I had a model that matched the basic description. The shape was good, but the details were a bit soft. The iron fittings were present but not sharply defined, and the coins were more of a suggested texture than distinct objects. This mode seems perfect for quick iterations to get the basic form right.
- Focal Mode: This took closer to a minute, but the difference in quality was immediately obvious. The wood grain was more pronounced, the iron fittings had clear rivets and a hammered texture, and the coins were individual meshes spilling from the opening. The topology was visibly cleaner, with more defined edges. This mode is clearly the choice for a final asset.
After settling on the Focal model, I explored the OmniCraft sidebar. I was able to send the model directly to the AI Texture Generator to apply PBR materials without leaving the browser. The final step was exporting, and the options were all there: FBX, OBJ, GLB, USDZ, and STL. I grabbed the GLB file to use in a web-based viewer. The entire process, from text prompt to a fully textured and exported model, happened in one place. This is a huge advantage over using a separate text-to-3D model generator and then needing other software for texturing and conversion.
A Step-by-Step Workflow for Text-to-3D Generation
Regardless of the platform you choose, the creative process for turning a text prompt into a 3D model generally follows the same path. Here is a simple workflow you can adapt for any project.
1. Start with a Clear Concept
Before you write a single word, know what you want to create. Is it a character, a prop, or an environment piece? What is its function in your scene? A clear goal prevents you from wasting time on vague prompts that produce generic results.
2. Write Your Initial Prompt
Draft your first prompt using the structure we discussed: core subject, descriptive modifiers, and style. Don't overthink it at this stage. The goal is to get a baseline model to react to. For example: `a sci-fi cargo crate, metallic with glowing blue lights`.
3. Generate and Evaluate
Run the prompt through your chosen AI 3D model generator. Look at the output critically. Does it match your vision? Pay attention to the overall shape, key details, and style. Is the topology clean, or is it a mess of triangles? For example, if the glowing lights in your crate prompt look painted on instead of emissive, you know you need to refine your language.
4. Refine and Iterate
Now, start iterating. Add or change keywords to address what was missing in the first generation. If the crate was too simple, you might change the prompt to: `a heavily damaged sci-fi cargo crate, dented dark metal with exposed wiring, flickering blue emissive lights`. Each iteration should bring you closer to your desired result.
5. Post-Processing and Export
Once you have a model you're happy with, it's time for the final steps. This might involve using integrated tools like Hyper3D's OmniCraft suite to apply textures with an AI Texture Generator or clean up the mesh. Finally, export the model in the format you need, such as GLB for web applications or FBX for game engines. You can use a GLTF Viewer to check the final model.
Use Cases and Applications
Text-to-3D generation is more than just a novelty; it's a practical tool that is already being integrated into professional creative pipelines. Here are a few areas where this technology is making a significant impact.
Game Development
For indie developers and even large studios, text-to-3D is a powerful tool for asset creation. It can be used to quickly generate props, environmental assets, and even character bases. This dramatically speeds up prototyping and allows smaller teams to create richer, more detailed worlds without needing a massive art department.
Prototyping and Concept Art
Industrial designers, architects, and concept artists can use text-to-3D to quickly visualize ideas. Instead of spending hours modeling a concept from scratch, they can generate a 3D representation in minutes. This allows for faster iteration and more effective communication of ideas to clients and stakeholders.
3D Printing and Hobbyists
For hobbyists and makers, text-to-3D opens up a new world of creative possibilities. You can design custom miniatures for tabletop games, create unique household items, or generate parts for personal projects, all from a simple text description. With an Image-to-STL converter, you can even turn 2D concepts into printable 3D objects.
Augmented and Virtual Reality
As AR and VR experiences become more common, the demand for 3D content is exploding. Text-to-3D provides a scalable way to create the vast libraries of assets needed to populate these virtual worlds, from furniture and decorations to avatars and interactive objects.
FAQ
What is the best AI for text-to-3D?
There is no single "best" tool; it depends entirely on your needs. For the cleanest geometry and character work, Hyper3D's Rodin is a top choice. If you prioritize amazing textures and a polished user experience, Meshy AI is fantastic. For game developers who need speed and features like auto-rigging, Tripo AI is hard to beat.
How can I make my 3D prompts more detailed?
Think in layers. Start with your core subject, then add adjectives for materials, textures, and condition (e.g., `weathered`, `glossy`, `chipped`). Finally, add a style directive (`low-poly`, `photorealistic`, `cyberpunk`). Using negative prompts, if the tool supports them, can also help by telling the AI what to avoid.
Can I use text-to-3D models in game engines like Unity or Unreal?
Yes, absolutely. Most text-to-3D generators, including the ones mentioned in this article, allow you to export in formats like FBX and GLB, which are directly compatible with Unity and Unreal Engine. However, models from tools like Luma AI may require topology cleanup in a program like Blender before they are game-ready.
What's the difference between low-poly and high-poly models?
Low-poly models have a lower number of polygons, making them simpler and more performant, which is ideal for games and real-time applications. High-poly models have a much higher polygon count, allowing for greater detail and smoother surfaces, making them suitable for film, visual effects, and high-quality renderings.
Do I need to know how to 3D model to use a text-to-3D generator?
No, and that's the beauty of it. A text-to-3D model generator allows anyone to create 3D assets without any prior modeling experience. However, having some basic 3D knowledge will help you understand the output and make more effective prompts.
How do I get started with a 3d text prompt guide?
Start by experimenting! Pick a tool with a generous free tier, like Tripo AI or Hyper3D, and just start writing prompts. See how the AI interprets your words. Read guides like this one, and look at prompt examples on community forums or the tool's Discord server. The best way to learn is by doing.