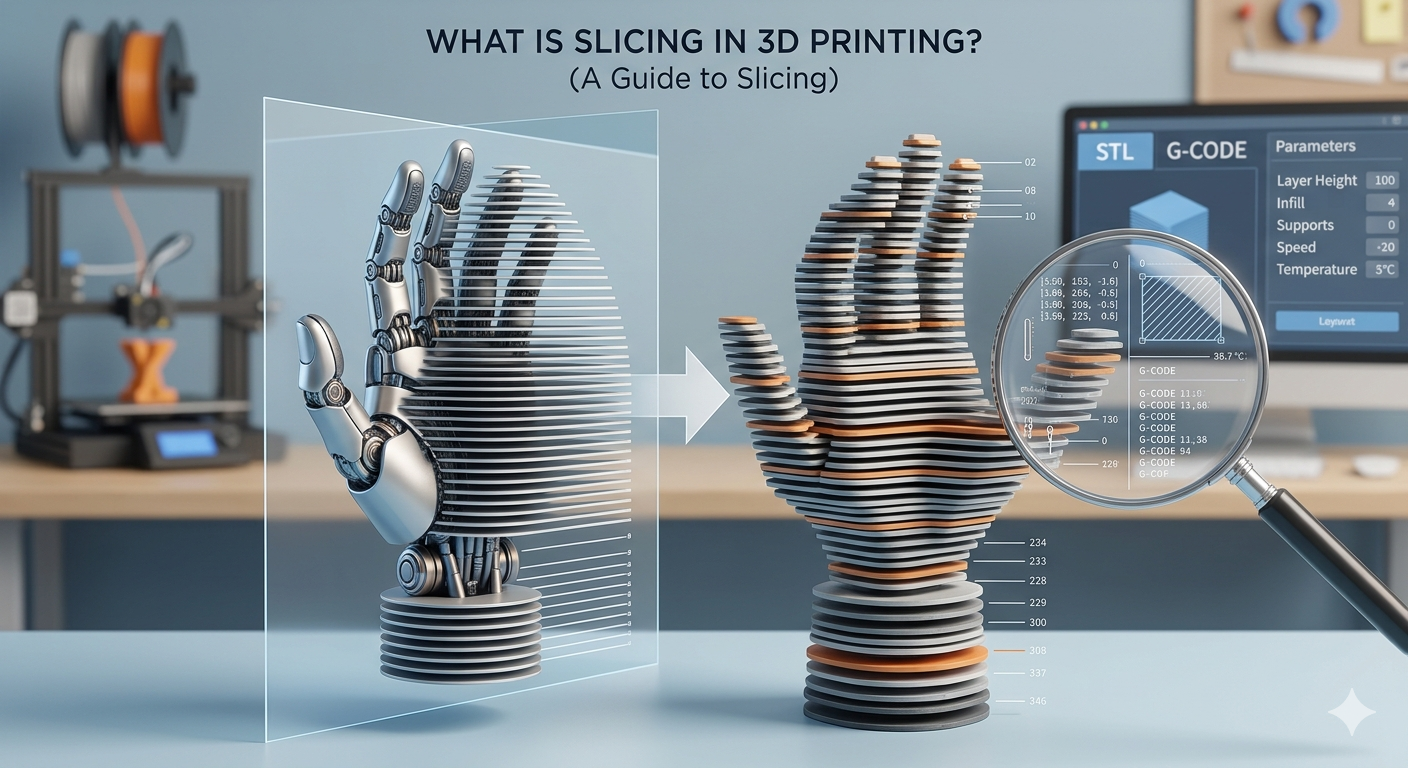
# What Is Slicing in 3D Printing? A Guide to Slicing 3D Printing
Slicing in 3D printing is the process of converting a 3D model into a language that a 3D printer can understand. This process is also known as slicing 3d printing. It's a critical step that translates your digital design into a physical object, layer by layer. Without slicing, your printer would have no instructions on how to create your model. This guide will walk you through everything you need to know about slicing 3d printing, from the basics of how it works to a comparison of popular slicing software like Cura, PrusaSlicer, and Simplify3D. We'll also touch on how an AI 3D printing tool can streamline your workflow.
How Slicing 3D Printing Works: From 3D Model to G-Code
The journey from a digital 3D model to a physical object involves a few key steps, with slicing 3d printing at the heart of the process. It all starts with a 3D model, typically in an STL or OBJ file format. These files describe the surface geometry of your object as a mesh of triangles. However, they don't contain any information about how the object should be printed.
This is where slicing software comes in. The slicer takes your 3D model and, as the name suggests, slices it into hundreds or even thousands of thin horizontal layers. For each layer, the slicer generates a set of instructions, known as G-code, that tells the 3D printer exactly what to do. This G-code is the universal language of 3D printers, dictating everything from the path of the print head to the temperature of the nozzle and the speed of the print. You can even use an image to STL converter to generate a 3D model from a 2D image, which you can then slice and print.
Key Slicing 3D Printing Parameters and Their Impact on Print Quality
Slicing 3d printing software offers a vast array of settings that can be overwhelming at first. However, understanding a few key parameters will give you a great deal of control over the quality of your prints. Here are some of the most important settings to master:
Layer Height: The Trade-off Between Speed and Resolution
Layer height is one of the most fundamental slicing parameters. It determines the thickness of each individual layer of your print. A smaller layer height, such as 0.1mm, will result in a smoother, more detailed surface finish, but it will also significantly increase the print time. Conversely, a larger layer height, like 0.3mm, will produce a print much faster, but the individual layers will be more visible, resulting in a rougher surface. The optimal layer height depends on the specific application, whether you need a highly detailed model or a quick prototype.
Infill Density and Patterns: Balancing Strength and Material Usage
Most 3D prints are not solid plastic. Instead, the interior of the model is filled with a low-density structure called infill. The infill density, expressed as a percentage, determines how much plastic is used to fill the inside of your print. A higher infill density will result in a stronger, heavier print, while a lower density will save material and print time. In addition to density, you can also choose from a variety of infill patterns, such as grid, gyroid, or honeycomb, each offering different trade-offs between strength, speed, and material usage.
Wall Thickness (Shells): Enhancing Durability
The wall thickness, also known as the shell, refers to the number of layers of plastic that make up the outer surface of your print. A thicker wall will create a stronger, more durable object, but it will also increase the print time and material consumption. For most prints, a wall thickness of two to three layers is a good starting point. If you're printing a functional part that needs to withstand stress, you may want to increase the wall thickness for added strength.
Supports and Adhesion: Preventing Print Failures
3D printers can't print in mid-air. For any parts of your model that have overhangs, the slicer needs to generate support structures to prevent the molten plastic from drooping or collapsing. These supports are printed along with your model and are removed after the print is complete. Additionally, to ensure that your print sticks to the build plate throughout the printing process, you can use adhesion settings like brims or rafts. A brim adds a single layer of plastic around the base of your model, while a raft creates a small platform that your model is printed on top of. These settings are especially useful when printing tall, thin objects or models with a small base.
Print Speed and Temperature: Optimizing for Different Materials
Every 3D printing filament has an optimal print speed and temperature. Printing too fast can result in poor layer adhesion and a rough surface finish, while printing too slow can lead to overheating and deformation. Similarly, the print temperature needs to be carefully controlled to ensure that the filament melts properly and fuses to the previous layer. Most slicers come with pre-configured profiles for common materials like PLA, ABS, and PETG, but you may need to fine-tune these settings to get the best results with your specific printer and filament. For more advanced materials, you may need to experiment to find the ideal combination of speed and temperature. If you're looking to create a 3D model from scratch, you can use an AI 3D model generator and then use a 3D format converter to get it in the right format for your slicer.
My First-Hand Experience with Slicing 3D Printing Software
As a 3D printing enthusiast, I've spent countless hours tinkering with slicing 3d printing software to get the perfect print. I recently worked on a project that involved creating a detailed miniature of a fantasy creature. The model had a lot of intricate details, including delicate wings and a long, thin tail. I knew that getting the slicing settings right would be crucial to the success of the print.
I decided to use Cura for this project, as it's a slicer I'm very familiar with. I started with the standard PLA profile, but I knew I'd need to make some adjustments to capture all the fine details of the model. First, I reduced the layer height to 0.1mm to get a smoother surface finish. This increased the print time significantly, but for a model this detailed, it was a worthy trade-off. I also enabled the 'tree support' feature in Cura, which generates organic-looking supports that are much easier to remove than traditional blocky supports. This was a lifesaver for the delicate wings of the creature.
One of the biggest challenges was the long, thin tail. I was worried that it would be too fragile and might break during the print or while removing the supports. To address this, I increased the wall thickness to three layers and used a gyroid infill pattern at 20% density. The gyroid pattern is known for its strength in all directions, and I hoped it would provide the necessary support for the tail without adding too much weight or print time. The final print came out beautifully, with all the intricate details preserved. The tree supports were a breeze to remove, and the tail was surprisingly strong. This experience was a great reminder of how powerful slicing software can be in turning a challenging model into a successful print. If you want to try creating your own 3D models from images, you can use an image to 3D tool.
Objective Comparison of Popular Slicing 3D Printing Software
Choosing the right slicing 3d printing software can be just as important as choosing the right 3D printer. While there are many slicers available, three of the most popular options are Cura, PrusaSlicer, and Simplify3D. Here's a look at the pros and cons of each:
Cura
Pros:
- Free and Open-Source: Cura is completely free to use and is developed by a large community of users and developers.
- User-Friendly Interface: Cura has a clean and intuitive interface that is easy for beginners to learn.
- Extensive Printer Support: Cura supports a wide range of 3D printers, and you can also create custom printer profiles.
- Powerful Features: Despite its user-friendly interface, Cura offers a vast array of settings and features for advanced users, including tree supports and experimental settings.
Cons:
- Slower Slicing Speeds: Cura can be slower at slicing complex models compared to some other slicers.
- Occasional Bugs: As with any open-source software, you may encounter occasional bugs or stability issues.
PrusaSlicer
Pros:
- Excellent for Prusa Printers: PrusaSlicer is developed by Prusa Research and is optimized for their line of 3D printers.
- Advanced Features: PrusaSlicer offers a number of advanced features, including automatic variable layer height and a powerful support generation system.
- Great Print Quality: PrusaSlicer is known for producing high-quality prints with minimal tweaking.
Cons:
- Steeper Learning Curve: PrusaSlicer has a more complex interface than Cura and can be more intimidating for beginners.
- Best with Prusa Printers: While PrusaSlicer can be used with other printers, it is most effective when used with Prusa printers.
Simplify3D
Pros:
- Fast Slicing Speeds: Simplify3D is known for its fast slicing speeds, even with complex models.
- Excellent Support Generation: Simplify3D offers a powerful and highly customizable support generation system.
- Advanced Features: Simplify3D offers a number of advanced features, including the ability to print different parts of a model with different settings.
Cons:
- Paid Software: Unlike Cura and PrusaSlicer, Simplify3D is a paid software, which can be a barrier for some users.
- Less Frequent Updates: Simplify3D has a slower development cycle than Cura and PrusaSlicer, so you may have to wait longer for new features and bug fixes.
Recommendations:
- For Beginners: Cura is an excellent choice for beginners, thanks to its user-friendly interface and extensive community support.
- For Prusa Owners: If you own a Prusa 3D printer, PrusaSlicer is the obvious choice, as it is optimized for your machine.
- For Advanced Users: If you're an advanced user who needs the fastest slicing speeds and the most powerful features, Simplify3D is a great option, as long as you're willing to pay for it.
FAQ about Slicing 3D Printing
What is the best slicing software for beginners?
For beginners, Cura is often recommended as the best slicing 3d printing software. Its user-friendly interface, extensive community support, and pre-configured profiles for a wide range of printers make it easy to get started with 3D printing. While it has a simple interface, it also offers a wealth of advanced settings that you can explore as you become more experienced.
How does slicing for resin printers differ from FDM printers?
Slicing for resin printers, which use technologies like SLA or DLP, is fundamentally different from slicing for FDM printers. While FDM slicers generate G-code that controls the movement of a print head, resin slicers create a series of images that are projected onto the resin to cure it layer by layer. Resin slicers also have different settings, such as exposure time and lift speed, that are specific to the resin printing process.
Can I use any slicer with any 3D printer?
While many slicers are compatible with a wide range of 3D printers, it's not always a one-size-fits-all solution. Some printers, especially those from manufacturers like Prusa and LulzBot, have their own customized versions of popular slicers that are optimized for their machines. It's always a good idea to check the manufacturer's recommendations for the best slicer to use with your specific printer.
What are the most common slicing mistakes to avoid?
Some of the most common slicing mistakes include incorrect layer height settings, insufficient supports for overhangs, and poor bed adhesion. It's also important to make sure that you have the correct filament profile selected for the material you are using. Experimenting with different settings and printing small test models is a great way to learn how to avoid these common pitfalls.
How much does slicing software cost?
Many of the most popular slicing software options, including Cura and PrusaSlicer, are completely free and open-source. However, there are also paid options available, such as Simplify3D, which offer advanced features and dedicated support. For most users, the free options are more than sufficient, but if you're a professional or an advanced user who needs the absolute best performance, a paid slicer might be worth the investment.
Conclusion
Slicing 3d prSlicing 3d printing is an essential part of the 3D printing workflow, and understanding how it works is key to achieving high-quality prints.By mastering the key slicing parameters and choosing the right software for your needs, you can unlock the full potential of your 3D printer and bring your digital creations to life. Whether you're a beginner or an experienced user, there's always more to learn about the art and science of slicing. So don't be afraid to experiment with different settings, try out new slicers, and push the boundaries of what's possible with your 3D printer.