

_This article was written by a human author._
# 3D Print from Photo: Turn Any Image Into a 3D Model
Have you ever looked at a photo and wished you could hold a physical version of it in your hands? With the advancement of 3D printing technology, turning a 2D image into a tangible 3D object is not just a futuristic concept-it's a reality that's accessible to everyone. Whether you want to create a unique piece of art, a personalized gift, or a custom part, the ability to 3D print from a photo opens up a world of creative possibilities. Several platforms and tools are available to help you transform your images into 3D models, each with its own set of features and capabilities. From simple online converters that do the work for you to more advanced 3D modeling software that gives you complete control, there's a solution for every skill level and project type.
How to 3D Print from a Photo: The Main Methods: 3D Print From Photo
There are several ways to approach turning a photo into a 3D printable file. The best method for you will depend on the type of image you have, your desired outcome, and your level of technical expertise. Let's explore the most common techniques.
Using Online Image-to-3D Converters: 3D Print From Photo
The most straightforward method for beginners is to use an online image to 3D converter. These web-based tools automatically convert a 2D image into a 3D model, typically in an STL format, which is ready for 3D printing. The process is as simple as uploading your image and letting the software work its magic. These converters often interpret the light and dark areas of an image as different heights, creating a 3D relief. This method works best for images with clear outlines and high contrast, such as logos, text, or silhouettes. Many platforms, including Hyper3D's image to STL for printing tool, offer this functionality, making it easy to get started with your first 3D print from a photo.
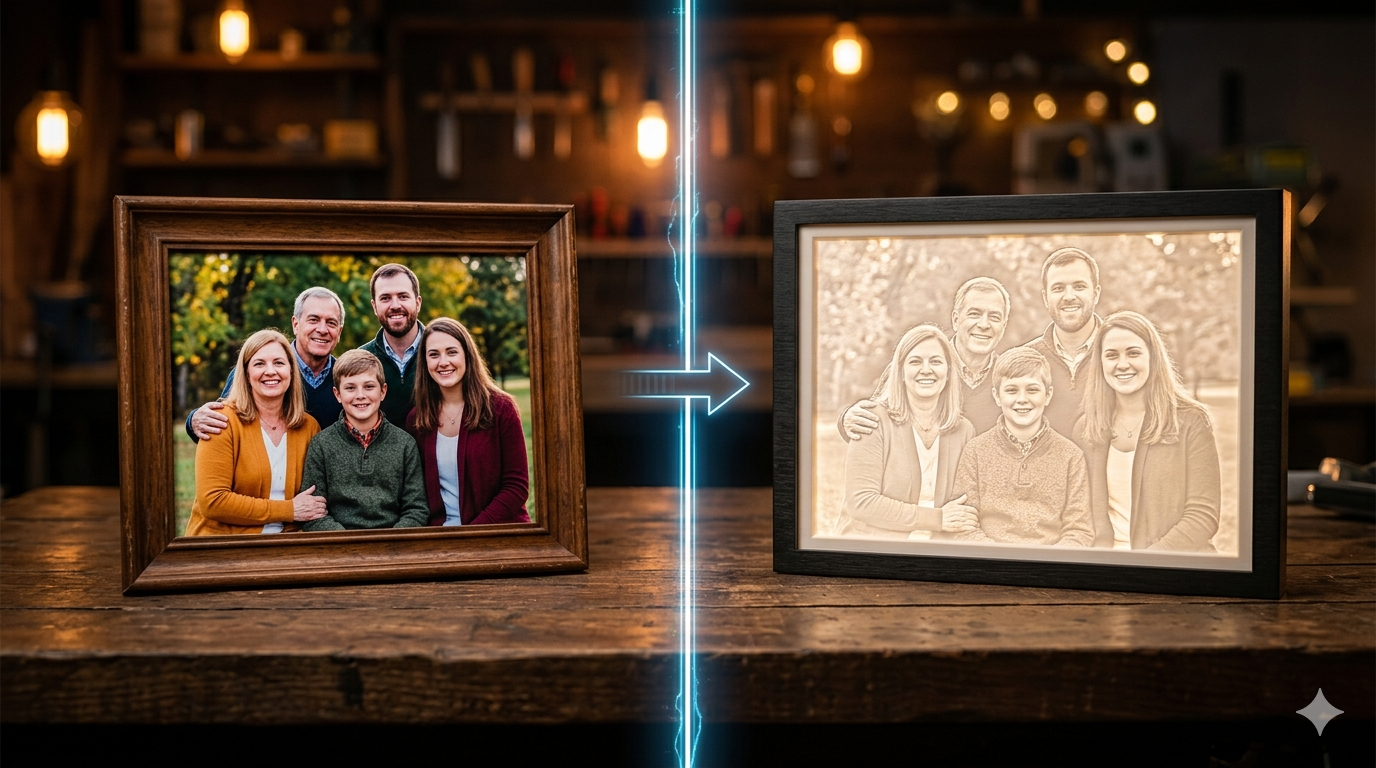
Creating Lithophanes: 3D Printing Your Photos
A particularly fascinating way to 3d print from photo is by creating a lithophane. A lithophane is a thin, translucent plaque that, when backlit, reveals a detailed image. The magic lies in the varying thickness of the print; thinner parts allow more light to pass through, appearing brighter, while thicker parts appear darker. This technique can turn your favorite photographs into stunning, tangible memories. Several free online lithophane generators are available that make this process incredibly simple. You just upload your photo, tweak a few settings, and download the 3D model ready for your printer.
Manual 3D Modeling from a Reference Photo
For those who want maximum control over the final product, manual 3D modeling is the way to go. This involves importing your photo into a 3D modeling software program like Blender, Fusion 360, or ZBrush and using it as a reference to build a 3D model from scratch. While this method has a steeper learning curve, it allows for a level of detail and accuracy that automated tools can't match. You can trace outlines, sculpt shapes, and add intricate details to create a truly custom piece. This approach is ideal for creating complex or artistic models that require a human touch.
Photogrammetry: Creating 3D Models from Multiple Photos
If your goal is to create a realistic 3D model of a real-world object, photogrammetry is the most powerful technique. This process involves taking dozens or even hundreds of photos of an object from every possible angle. Specialized photogrammetry software then analyzes these images, identifies common points, and stitches them together to create a detailed, textured 3D model. While it can be time-consuming and requires careful execution, photogrammetry can produce incredibly lifelike results when you want to 3d print from photo, making it a popular choice for everything from video game asset creation to historical preservation.
My First-Hand Experience: Testing Image-to-3D Tools
To get a real feel for the process, I decided to test out a couple of online image-to-3D converters. I chose a simple, high-contrast image of a coffee cup to see how well the tools could handle a basic shape. My goal was to see how quickly and easily I could get a printable 3D model.
First, I tried Hyper3D's image to STL for printing tool. The interface was clean and straightforward. I uploaded my coffee cup image, and within seconds, a 3D preview of the model appeared. The tool did a great job of capturing the outline of the cup, creating a solid, embossed-style model. I was impressed with the speed and the quality of the initial conversion. The platform also offered some basic customization options, allowing me to adjust the thickness and smoothness of the model before downloading the STL file. The entire process, from upload to download, took less than a minute.
Next, I tested a popular free online converter called `imagetostl.com`. The process was similarly simple: upload the image, and the tool generates the 3D model. This tool also produced a decent result, but it interpreted the image slightly differently, creating a model with more pronounced stepping on the curved edges. It also offered fewer customization options compared to the Hyper3D tool. While both tools successfully converted the image, I found that Hyper3D's 3D printing model generator provided a smoother, more refined result with less manual cleanup required.
Objective Comparison of Image-to-3D Converters
To help you choose the right tool for your project to 3d print from photo, here's a comparison of some of the popular options available for turning a photo into a 3D model. Each tool has its strengths, and the best one for you will depend on your specific needs.
| Feature | Hyper3D | imagetostl.com | Meshy AI |
|---|---|---|---|
| Ease of Use | Very easy | Very easy | Easy |
| Key Features | Fast conversion, smoothing, thickness control | Basic conversion, some customization | AI-powered generation, text-to-3D, texture generation |
| Output Formats | STL, OBJ, FBX, GLB, USDZ | STL | GLB, FBX, USDZ |
| Cost | Free tier, paid plans for advanced features | Free | Free credits, subscription plans |
Hyper3D
Hyper3D's suite of tools, including the AI 3D model generator and the specific image to 3D converter, offers a great balance of simplicity and power. The platform is incredibly user-friendly, making it an excellent choice for beginners. The fast conversion times and the ability to fine-tune the model with smoothing and thickness controls are significant advantages. With support for a wide range of output formats, including STL, OBJ, and GLB, it provides a lot of flexibility for both 3D printing and other 3D applications. The availability of a 3D format converter is also a huge plus.
Pros:
- Very intuitive and easy to use.
- Fast and high-quality conversions.
- Multiple output formats and editing capabilities.
Cons:
- Advanced features may require a paid plan.
imagetostl.com
As its name suggests, `imagetostl.com` is a straightforward, no-frills tool for converting images to the STL format. It's completely free and incredibly easy to use, making it a good option for quick, simple conversions. If you have a high-contrast logo or design and just need a basic 3D model for printing, this tool gets the job done. However, it lacks the advanced features and customization options of more sophisticated platforms.
Pros:
- Free and very simple to use.
- Quick conversion process.
Cons:
- Limited to STL output.
- Fewer customization options.
- Results may require more manual cleanup.
Meshy AI
Meshy AI represents the next generation of image-to-3D conversion, using artificial intelligence to generate models from images or even text prompts. This platform is more than just a simple converter; it attempts to understand the content of the image and create a more detailed and complex 3D model. It can even generate textures, which is a huge advantage for creating realistic models. While it's still a developing technology, the results can be impressive, especially for more organic shapes. It's a great tool for artists and designers looking to experiment with AI-driven 3D creation.
Pros:
- AI-powered generation for more complex models.
- Can generate textures from the image.
- Also supports text-to-3D generation.
Cons:
- The technology is still evolving, and results can be unpredictable.
- May be more complex than a simple converter for basic needs.
Tips for Getting the Best Results When You 3D Print from a Photo
Creating a successful 3d print from photo often involves more than just clicking a button. To ensure you get the best possible outcome, here are a few tips to keep in mind:
Choosing the right image is the first and most critical step to 3d print from photo. The quality and type of your source image play a huge role in the final result. High-contrast images with clean lines and clear subjects work best for automated converters. If you're creating a lithophane, choose a photo with a good range of light and shadow to create a detailed final print.
A little bit of image editing can also go a long way. Before uploading your photo, consider converting it to grayscale, increasing the contrast, and removing any distracting backgrounds. This pre-processing helps the conversion software to better interpret the shapes and depths in your image, leading to a cleaner 3D model.
It's also important to understand the limitations of automated converters. While powerful, they aren't magic. They work by interpreting pixel data, which can sometimes lead to unexpected results. Be prepared to do some manual cleanup of the 3D model in a program like Meshmixer or Blender to fix any imperfections.
Finally, optimizing your slicer settings is crucial for a successful print. Once you have your 3D model, you'll need to prepare it for printing in a slicer program like Cura or PrusaSlicer. For lithophanes, you'll want to print with 100% infill to ensure the image is clear. For other types of models, you may need to add supports to ensure that overhangs print correctly.
FAQ About 3D Printing from Photos
What is the best image format for converting to a 3D model?
For most online converters to 3d print from photo, standard image formats like JPG, PNG, and BMP are all perfectly acceptable. The format of the image is less important than its content. A high-resolution image with good contrast will almost always yield better results than a low-resolution or blurry one, regardless of the file type.
Can I 3D print a photo of a person's face?
Yes, you can 3d print from photo of a person's face, but the method you choose will greatly affect the outcome. Using a simple image-to-3D converter on a single photo of a face will likely result in a flat, embossed-style model. For a more realistic 3D portrait, you would need to use photogrammetry, which requires multiple photos of the person's head from all angles, or use specialized software designed for creating 3D avatars from photos, like Hyper3D's ChatAvatar.
How much does it cost to 3D print from a photo?
The cost to 3d print from photo can vary widely. The conversion from a 2D image to a 3D model can often be done for free using online tools. The main cost comes from the 3D printing itself, which depends on the size and complexity of the model, the material used, and whether you own your own 3D printer or use a printing service.
What's the difference between a lithophane and a regular 3D model from a photo?
A lithophane is a specific type of 3D print where the image is visible only when backlit. It's a thin sheet of plastic with varying thicknesses that correspond to the light and dark areas of the photo. A regular 3D model from a photo, on the other hand, is a fully three-dimensional object that represents the subject of the image, which you can view from all angles.
What software do I need to 3D print from a photo?
At a minimum, you will need a slicer program (like Cura or PrusaSlicer) to prepare your 3D model for printing. To create the model itself, you can use a free online converter, a lithophane generator, or more advanced 3D modeling software like Blender if you want to create the model manually. Many of these tools are free and open-source.
Conclusion
Turning a simple photograph into a physical object is a powerful capability of modern 3D printing. From creating personalized gifts to producing custom parts, the ability to 3d print from photo is more accessible than ever. This is a great way to get started with 3d printing. Whether you opt for the simplicity of an online converter, the artistry of a lithophane, or the precision of manual modeling, there is a method available to suit your needs. The journey from a 2D image to a 3D print is a rewarding one, and with the tools and techniques discussed in this article, you are well-equipped to start your own creative projects. We encourage you to experiment with these methods and discover the amazing possibilities of bringing your photos to life.