

Lithophane from Photo: Create 3D Photo Art for Printing
A lithophane is a unique and fascinating way to bring your photos to life. This 3D photo art, also known as a lithophane, is a unique and fascinating way to bring your photos to life. It?? a 3D representation of an image that only reveals its details when backlit. While the art form has been around for centuries, 3D printing has made it accessible to everyone. Today, you can find a variety of tools, from dedicated web apps to powerful 3D modeling software, that can turn your favorite pictures into stunning lithophanes. In this article, we'll explore how you can create your own 3D photo art from a photo, from choosing the right image to the final 3D print.
What is a Lithophane?
A lithophane is an etched or molded artwork in thin translucent material that can only be seen clearly when back-lit. The image appears in grayscale, and the light and dark areas are created by varying the thickness of the material. Thicker parts appear darker, while thinner parts appear lighter. This creates a stunning three-dimensional effect that adds depth and realism to your photos.
A Brief History of This Art Form
The concept of this art form dates back to the 1820s in France. Originally, they were made from porcelain and were a popular art form in the 19th century. The process was painstaking, involving carving a design into a sheet of wax, creating a plaster mold, and then casting it in porcelain. The resulting plaques were delicate and expensive, making them a luxury item.
How 3D Printing Revolutionized This Art Form
ThThe advent of 3D printing has completely transformed the way these 3D photos are made.ade. Now, anyone with a 3D printer can create their own high-quality lithophanes at home. The process is much faster, more affordable, and allows for a greater degree of customization. You can create lithophanes in various shapes and sizes, from flat panels to curved lampshades and even night lights. The accessibility of 3D printing has led to a resurgence in the popularity of this beautiful art form.
How to Create a Lithophane from a Photo
Creating a 3D photo art from a photo is a straightforward process, but there are a few key steps to follow to ensure the best results. It all starts with selecting the right photo and then using a specialized tool to convert it into a 3D model.
Choosing the Right Photo
The quality of your 3D photo art depends heavily on the photo you choose. High-contrast images with a good range of tones tend to work best. Photos with a lot of fine detail can also produce impressive results. When selecting a photo, look for one with a clear subject and a simple background. This will help the main subject stand out when the lithophane is backlit. Avoid images that are too dark or too light, as this can result in a loss of detail.
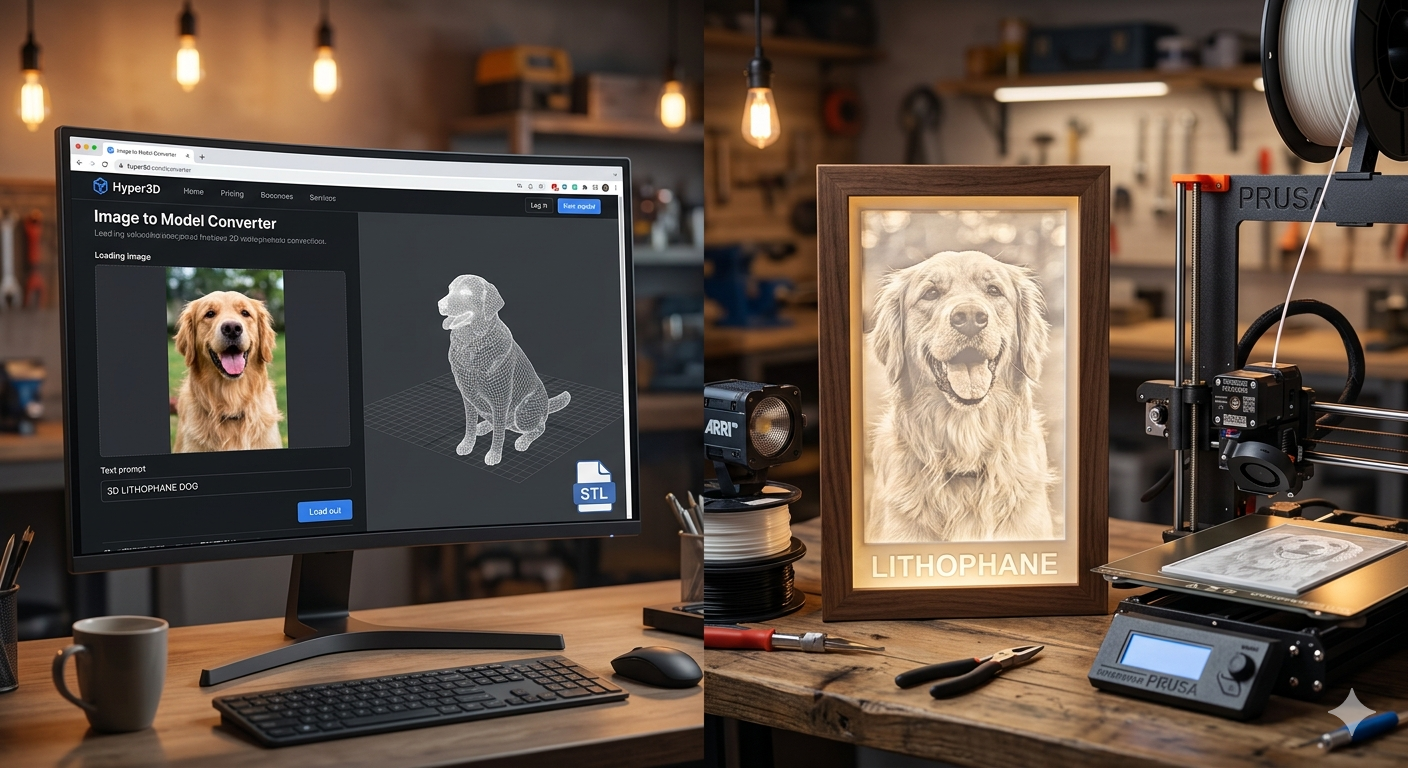
Using an Image to 3D Model Converter
Once you have your photo, you'll need to use an image to 3D model converter to turn it into a 3D model. There are many online tools available, each with its own set of features. Some are simple and easy to use, while others offer more advanced options for customization. For those looking for a powerful and versatile tool, Hyper3D's image to STL converter is an excellent choice. It allows you to quickly and easily convert your images into high-quality STL files ready for 3D printing. If you need more advanced 3D models, you can also explore their 3D printing model generator.
Slicing and Printing Your 3D Photo Art
After you've generated your STL file, the next step is to slice it for 3D printing. This involves using a slicer program to convert the 3D model into a set of instructions that your 3D printer can understand. When slicing a 3D photo art, it's important to use the right settings to ensure the best possible quality. Printing with a small layer height and a slow print speed will help to capture all the fine details in the image. It's also a good idea to print the 3D photo art standing up, with a brim to help it adhere to the print bed.
My First-Hand Experience Creating a Lithophane
I decided to try my hand at creating a 3D photo art to see how easy it really is. I started with a photo of my dog, which had good contrast and a clear subject. I first used a popular free online lithophane generator. The process was simple enough: I uploaded my photo, adjusted a few settings, and downloaded the STL file. The result was decent, but I felt that some of the finer details were lost.
Next, I tried Hyper3D's image to 3D tool. The interface was clean and intuitive, and I was able to generate the STL file in just a few clicks. I was immediately impressed with the quality of the 3D model. The details were much sharper, and the overall result was more impressive. The printing process was smooth, and the final 3D photo art was a beautiful representation of my photo. For those looking for even more creative control, Hyper3D also offers an AI 3D model generator that can generate 3D models from text prompts.
Comparing Lithophane Generators
There are many different 3D photo art generators available, each with its own strengths and weaknesses. Here's a quick comparison of some of the most popular options:
- Free Online Lithophane Makers: These are a great option for beginners. They are easy to use and don't require any software installation. However, they often have limited features and may not produce the highest quality results.
- Hyper3D's Tools: For those who want more control and higher quality, Hyper3D offers a suite of powerful tools. Their image to STL converter is perfect for creating high-quality lithophanes, and their 3D format converter is great for converting between different 3D file formats. The platform provides a good balance of ease of use and advanced features.
- 3D Modeling Software: For the ultimate in customization, you can use 3D modeling software like Blender to create your lithophanes. This gives you complete control over every aspect of the design, but it also has a steep learning curve.
Ultimately, the best 3D photo art generator for you will depend on your needs and experience level. If you're just starting out, a free online tool is a great way to get your feet wet. If you're looking for higher quality and more features, Hyper3D's tools are an excellent choice. And if you're a seasoned pro, 3D modeling software will give you the freedom to create truly unique designs.
Advanced Lithophane Techniques
Once you've mastered the basics of creating flat 3D photo art, you can start to explore some more advanced techniques.
Creating Curved 3D Photo Art
Curved 3D photo art can be used to create beautiful lampshades, night lights, and other decorative items. The process is similar to creating a flat 3D photo art, but you'll need to use a tool that supports curved surfaces. Many online 3D photo art generators have this feature built-in, allowing you to create cylinders, spheres, and other curved shapes.
Adding Color to Your 3D Photo Art
While traditional 3D photo art are grayscale, it is possible to add color to them. One popular method is to print the 3D photo art in white and then use markers or paint to color the back. When the 3D photo art is backlit, the colors will shine through, creating a beautiful stained-glass effect. Another method is to use a multi-material 3D printer to print the 3D photo art in different colors.
Frequently Asked Questions (FAQ)
What is the best filament for lithophanes?
The best filament for lithophanes is typically a light-colored PLA, such as white or off-white. This allows the light to pass through easily and reveals the details of the image.
How thick should a lithophane be?
The ideal thickness for a lithophane is around 3mm. This provides a good balance between strength and translucency. Thicker 3D photo art will be more durable but may not be as bright when backlit.
Can I make a lithophane from any photo?
You can make a lithophane from almost any photo, but high-contrast images with a good range of tones will produce the best results. It's also a good idea to choose a photo with a clear subject and a simple background.
What is the best lithophane maker?
The best lithophane maker depends on your needs and experience level. Free online tools are great for beginners, while more advanced users may prefer the features and quality of a tool like Hyper3D's image to STL converter.
How do you light a lithophane?
You can light a lithophane with any light source, but LED lights are a popular choice because they are cool to the touch and energy-efficient. You can place the lithophane in a window, in a lightbox, or even create a custom-made lamp.
Conclusion
Creating a lithophane from a photo is a rewarding and enjoyable project that combines art, technology, and personal memories. With the right tools and a little bit of practice, you can turn your favorite photos into stunning 3D printed works of art. Whether you're a seasoned 3D printing enthusiast or a complete beginner, we encourage you to give it a try and see for yourself the magic of lithophanes.