

3D Print Troubleshooting: Fix Common Printing Failures
3D printing can be a rewarding hobby, but it's not without its frustrations. When a print fails, it can be tricky to diagnose the root cause. Whether you're using a high-end machine or a budget-friendly model, issues can arise from a variety of factors, including software settings, material properties, and hardware calibration. This guide will walk you through some of the most common 3D printing problems and how to fix them, providing a solid foundation for your 3D print troubleshooting efforts, so you can get back to creating amazing things. We'll touch on solutions that can be applied across different platforms, from open-source firmware like Marlin to integrated software and hardware systems.
3D Print Troubleshooting: Solving Bed Adhesion Problems
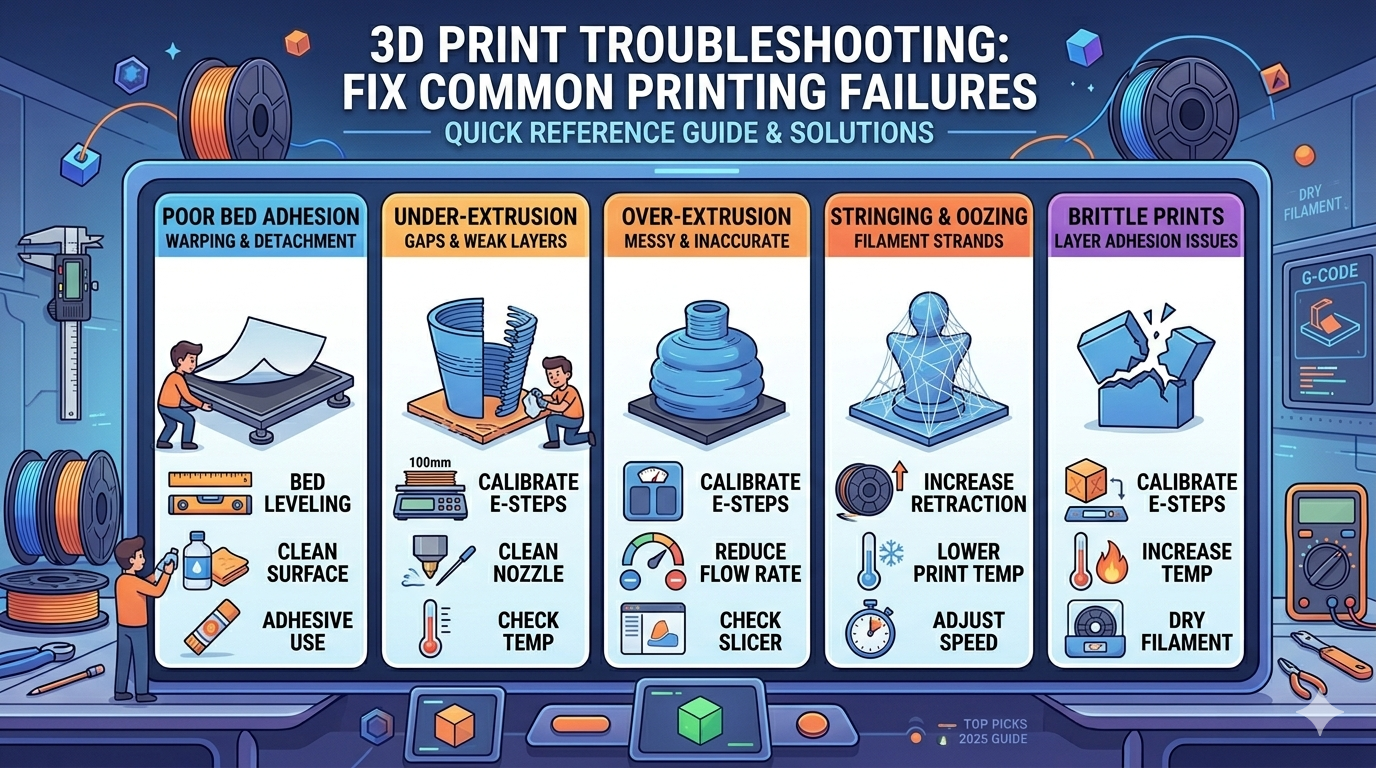
One of the most frequent issues in 3D printing, and a key area of 3d print troubleshooting, is getting the first layer to stick properly to the print bed. A weak first layer can ruin the entire print, leading to warping or complete detachment. Here are some common causes and solutions for poor bed adhesion.
Bed Leveling
A level print bed is crucial for a successful first layer. If the nozzle is too far from the bed, the filament won't adhere properly. If it's too close, it can block the nozzle and prevent filament from extruding. Most modern printers have an auto-leveling feature, but it's still a good practice to manually check the bed level from time to time. You can do this by using a piece of paper and adjusting the bed until you feel a slight drag on the paper between the nozzle and the bed at various points.
Print Surface Preparation
The surface of your print bed plays a significant role in adhesion. A clean, textured surface is ideal. If you're printing on a glass bed, make sure it's clean and free of any oils or grease. Wiping it down with isopropyl alcohol before each print is a good habit. For extra adhesion, you can apply a thin layer of glue stick or a specialized bed adhesive. If you're using a PEI sheet, a light sanding with fine-grit sandpaper can help restore its adhesive properties.
3D Print Troubleshooting: Extrusion and Material-Related Issues
Even with a perfect first layer, your print can still fail due to problems with how the filament is extruded. This is a common area for 3d print troubleshooting. These issues can manifest in various ways, from weak and brittle prints to messy and stringy surfaces.
Under-Extrusion and Over-Extrusion
Under-extrusion occurs when the printer doesn't extrude enough filament, resulting in gaps and thin layers. Over-extrusion is the opposite, where too much filament is extruded, leading to a messy and inaccurate print. The most common cause for both is an incorrect extruder calibration (E-steps). You should calibrate your extruder to ensure that when you tell it to extrude 100mm of filament, it extrudes exactly 100mm. Other causes can include a partially clogged nozzle, incorrect print temperature, or a wrong filament diameter setting in your slicer software.
Stringing and Oozing
Stringing, or oozing, happens when thin strands of filament are left behind as the print head moves between different parts of the model. This is most common with flexible filaments but can happen with any material. The primary cause of stringing is retraction settings. Retraction is when the extruder pulls the filament back to relieve pressure in the nozzle. If your retraction distance is too short or the speed is too slow, filament will continue to ooze out. You can also try lowering your print temperature or increasing your travel speed to minimize the time the nozzle spends over open air. For more complex models, you might consider using a tool like an AI 3D model generator to optimize the geometry for printing.
My First-Hand Experience with 3D Print Troubleshooting
I've spent countless hours hunched over my 3D printer, engaging in some serious 3d print troubleshooting. One of the most frustrating experiences was dealing with persistent under-extrusion on a large print. I tried everything from cleaning the nozzle to adjusting the temperature, but nothing seemed to work. Finally, I decided to recalibrate my extruder's E-steps, and that's when I discovered the problem. The factory settings were off by almost 10%, which meant I was consistently pushing out less filament than the slicer intended. After the calibration, my prints were immediately stronger and more accurate.
Another challenge I faced was getting detailed models to print correctly. I was working on a project that involved converting a 2D image to a 3D model using an image to 3D tool. The initial results were a bit rough, with a lot of stringing and artifacts. I experimented with different retraction settings and even tried a new nozzle, but the biggest improvement came from using a 3D format converter to switch from STL to a more solid format like GLB. This, combined with a lower print temperature, finally gave me the clean and detailed print I was looking for. For those who need to generate models for 3D printing, a dedicated 3D printing model generator can also be a great help.
Objective Comparison: Slicer Software
Your slicer software is a critical component of your 3D printing workflow, and choosing the right one can be a part of your 3d print troubleshooting strategy. It takes your 3D model and converts it into instructions that your printer can understand. While there are many slicers available, here?? a look at three of the most popular options and where they excel.
Cura
Pros:
- Free and Open-Source: Cura is completely free to use and has a large and active community.
- User-Friendly Interface: It?? known for its intuitive interface, making it a great choice for beginners.
- Extensive Plugin Library: You can extend Cura?? functionality with a wide range of plugins.
Cons:
- Slower Slicing Speeds: Compared to some other slicers, Cura can be a bit slower, especially with complex models.
- Default Profiles Can Be Inconsistent: While there are many profiles available, the quality can vary, and you may need to do some tweaking to get the best results.
PrusaSlicer
Pros:
- Excellent Default Profiles: PrusaSlicer is known for its well-tuned profiles, especially for Prusa printers.
- Advanced Features: It offers a lot of advanced features, such as conditional G-code and variable layer height.
- Regular Updates: The development team is very active, and the software is updated frequently with new features and bug fixes.
Cons:
- Steeper Learning Curve: With its advanced features, PrusaSlicer can be a bit more intimidating for beginners.
- Interface Can Be Cluttered: The interface is not as clean as Cura??, and it can be a bit overwhelming at first.
Simplify3D
Pros:
- High-Quality Slicing: Simplify3D is renowned for its high-quality slicing engine, which can produce excellent results.
- Customizable Supports: It offers some of the best and most customizable support generation tools.
- Fast Slicing Speeds: It?? one of the fastest slicers available, which can be a big advantage for large and complex models.
Cons:
- Paid Software: Unlike Cura and PrusaSlicer, Simplify3D is a paid product.
- Less Frequent Updates: The development cycle is slower than its competitors, and new features are not released as often.
For those who work with various file formats, an image to STL converter can be a useful tool to have in your arsenal, and a good slicer will handle the output of these converters with ease.
FAQ
What is the best way to clean a 3D printer nozzle?
Cleaning a nozzle can be done in a few ways. A "cold pull" is a popular method where you heat the nozzle, manually push some filament through, let it cool down slightly, and then pull the filament out, which should bring any debris with it. You can also use a small needle or a nozzle cleaning kit to clear out any blockages. For tougher clogs, you might need to remove the nozzle and soak it in a solvent like acetone (for ABS) or use a heat gun.
How can I prevent my prints from warping?
Warping is usually caused by poor bed adhesion and the plastic contracting as it cools. To prevent it, make sure your print bed is clean and level. Using a heated bed is also very effective, as it keeps the lower layers of the print warm and prevents them from shrinking. For materials like ABS, an enclosure around the printer can help maintain a stable ambient temperature and reduce warping.
What is the difference between PLA and ABS filament?
PLA (Polylactic Acid) is a biodegradable plastic made from renewable resources like corn starch. It's one of the most popular filaments for beginners because it's easy to print with and doesn't require a heated bed. ABS (Acrylonitrile Butadiene Styrene) is a more durable and heat-resistant plastic, but it's also more challenging to print with. It requires a heated bed and a well-ventilated area due to the fumes it produces.
How do I know if my print bed is level?
A quick way to check your bed level is the paper test. Home your printer's Z-axis, then move the nozzle to different points on the bed. Slide a piece of paper between the nozzle and the bed. You should feel a slight amount of friction. If the paper slides through with no resistance, the bed is too low. If you can't get the paper under the nozzle at all, the bed is too high. Repeat this process at several points on the bed to ensure it's level all around.
Why are my 3D prints so brittle?
Brittle prints are often a sign of under-extrusion or poor layer adhesion. This is a classic 3d print troubleshooting problem. First, check your extruder calibration (E-steps) to make sure you're extruding the right amount of filament. You can also try increasing your print temperature slightly to help the layers bond together better. Another possible cause is moisture in your filament. If your filament has absorbed moisture from the air, it can become brittle. Storing your filament in a dry box can help prevent this.