

Image to 3D Model for 3D Printing: Step-by-Step
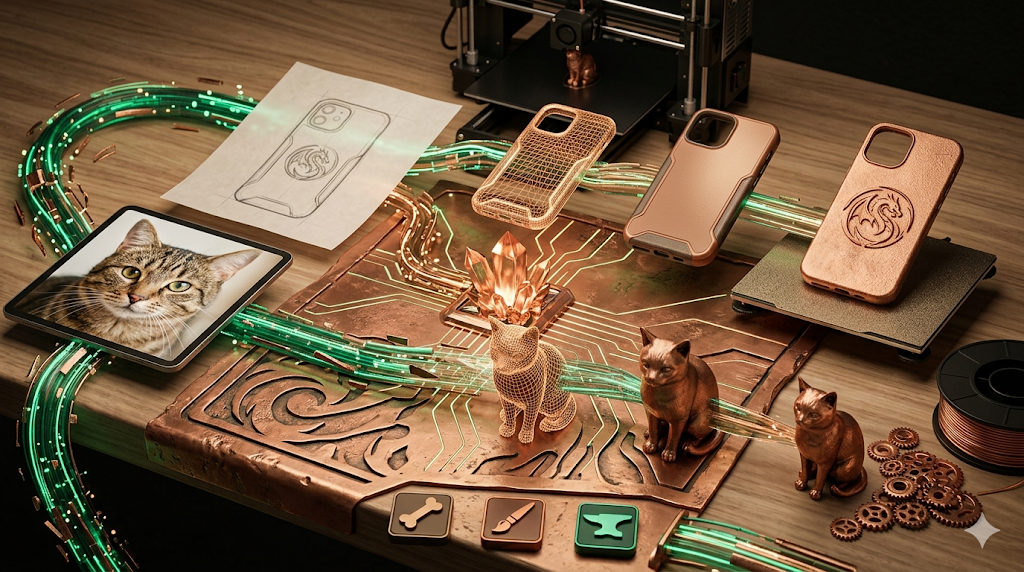
Turning a simple 2D image into a physical object you can hold in your hand feels like something out of science fiction. Just a few years ago, this process required complex 3D modeling software and hours of skilled work. Today, AI has made it possible for anyone to convert an image to a 3D model for 3D printing, often in just a few minutes. This has opened up a world of creative possibilities for hobbyists, designers, and entrepreneurs.
This is where image to 3d for printing tools really show their value.
Whether you're looking to create a custom phone case from a logo, a miniature of your pet, or a unique piece of jewelry from a sketch, AI-powered tools can get you there. Platforms like Meshy, Tripo, and Hyper3D each offer different approaches to this task, with unique strengths and weaknesses. This guide will walk you through the entire process, from picking the right image to getting your file ready for the printer, and help you choose the best tool for your project.
For anyone exploring image to 3d for printing options, this matters.
How Does Image to 3D for Printing Work?
At the basic level, converting an image to a 3D model for printing involves creating a three-dimensional mesh from two-dimensional pixel data. Early methods relied on simple extrusion, where software would essentially "pull" the dark parts of an image into a 3D shape, creating a basic lithophane or relief. This worked for logos and simple graphics but lacked true depth and detail.
The image to 3d for printing workflow makes this straightforward.
Modern AI tools use more advanced techniques, often based on diffusion models or Neural Radiance Fields (NeRF). These models are trained on vast datasets of images and their corresponding 3D shapes. When you upload an image, the AI analyzes it to understand the object's likely geometry, texture, and depth, even for parts not visible in the photo. It then generates a complete 3D mesh, often with PBR (Physically-Based Rendering) textures, that can be exported for various uses, including 3D printing.
That's a key advantage of modern image to 3d for printing technology.
Image To 3D For Printing: Key Technologies Involved
- Photogrammetry: While not strictly AI, this is the classic method of capturing an object from multiple photos and stitching them into a 3D model. Many AI tools use similar principles but infer the unseen angles.
When it comes to image to 3d for printing, the details matter.
- Diffusion Models: These AI models start with random noise and gradually refine it into a coherent 3D shape that matches the input image. This allows for creating detailed and complex geometry.
- Neural Radiance Fields (NeRF): NeRFs excel at creating realistic 3D scenes from a collection of 2D images. They are particularly good at capturing lighting and reflections, though the resulting meshes can sometimes be less clean for printing.
Top Tools for Image to 3D Printing Compared
Choosing the right tool depends entirely on your project's needs. Some are built for speed and simplicity, while others offer high-fidelity results for professional use. Here?? a look at some of the top platforms available right now.
| Tool | Best For | Top Strength | Key Limitation |
|---|---|---|---|
| Meshy AI | Texturing & UX | Best textures | Rougher geometry |
| Tripo AI | Game dev pipelines | Auto-rigging | STL export issues |
| Hyper3D | Topology & ecosystem | Cleanest geometry | Less versatile for stylized |
| Hunyuan3D | Free/budget | 20 free/day | Chinese interface |
| Luma AI | Rapid prototyping | Speed | Triangle soup topology |
Meshy AI
Meshy is a popular choice known for its polished user interface and powerful texturing capabilities. If your final model needs to look great with realistic materials, Meshy is a strong contender.
- Pros: Excellent texturing engine, clean and intuitive user experience, good library of styles like voxel and low-poly.
- Cons: The generated geometry can be less precise or "rough" for complex objects compared to other tools.
- Best for: Artists and designers who prioritize high-quality textures and a smooth workflow.
Tripo AI
Tripo has gained traction, especially among game developers. Its speed and features like auto-rigging make it a great fit for creating assets that need to be animated or used in a game engine.
- Pros: Very fast generation, built-in auto-rigging and segmentation, generous free credit system.
- Cons: Users have reported that STL files exported for 3D printing can sometimes have issues with normals, requiring fixing in another program.
- Best for: Game developers and users who need to create 3D models from images quickly for game pipelines.
Hyper3D (Rodin)
Hyper3D's Rodin engine is known for producing models with exceptionally clean and sharp topology. This makes it a go-to for creating high-quality character models or any object where geometric precision is important.
- Pros: Often produces the best geometry quality, features an all-in-one AI 3D model generator with the OmniCraft tool suite for editing and texturing, and supports multi-view inputs.
- Cons: Its specialization in high-quality characters and objects can sometimes make it less ideal for highly stylized or abstract props.
- Best for: Users who need clean, production-ready geometry, especially for character avatars and detailed objects.
My First-Hand Experience with Hyper3D
To get a feel for the workflow, I took Hyper3D's Rodin tool for a spin. My goal was to turn a simple image of a robot into a 3D printable model. The interface is clean, with a central upload area and a sidebar for tools. I uploaded my image and was presented with a few generation modes. I decided to test the 'Focal' mode, which the tool suggested was good for detailed objects.
The generation took about 45 seconds. The result was a surprisingly detailed 3D model with clean lines, even capturing the small antennas on the robot's head. The topology was solid, with no obvious holes or weird artifacts. From there, I used the OmniCraft sidebar to quickly access the export options. I chose STL, as that's the most common format for 3D printing. The whole process, from uploading the image to having a downloadable STL, took less than two minutes. For anyone needing a quick and clean model, the experience was very straightforward.
Step-by-Step Guide: From Image to 3D Print
Here is a general workflow that applies to most AI image-to-3D tools.
1. Choose the Right Image
A good input image is the most critical factor for a successful conversion. Look for:
- High Contrast: Clear separation between the subject and the background.
- Good Lighting: Avoid heavy shadows or blown-out highlights that hide details.
- Multiple Angles (if possible): Some tools, like Hyper3D, can use multiple images of an object to create a more accurate model.
2. Generate the 3D Model
Upload your image to your chosen platform, such as an Image-to-STL converter. Most tools will give you a few settings to tweak, such as the generation mode or desired level of detail. For your first time, the default settings are usually a good starting point.
3. Review and Refine the Mesh
Once the model is generated, inspect it in the tool's 3D viewer. Look for any holes, floating parts, or other errors. Many platforms include basic mesh editing tools to clean up the model. For more complex fixes, you may need to export the model to a program like Blender or Meshmixer.
4. Export as an STL File
For 3D printing, the STL (stereolithography) file format is the industry standard. It represents the surface geometry of a 3D object using a collection of triangles. Export your model as an STL file. Some tools also offer OBJ or FBX, but STL is the most reliable choice for slicer software. You can use an STL file viewer to double-check the exported file.
5. Prepare for Printing in a Slicer
A slicer is a piece of software that converts your 3D model into instructions your 3D printer can understand (G-code). Popular slicers include PrusaSlicer, Cura, and Bambu Studio.
- Import the STL: Open your slicer and import the STL file.
- Orient and Scale: Position the model on the build plate for optimal printing. You may need to rotate it to minimize overhangs or scale it to your desired size.
- Add Supports: For parts of the model that hang in the air, you will need to add support structures. Most slicers can do this automatically.
- Slice and Print: Once you are happy with the settings, slice the model and send it to your printer.
Use Cases and Applications
The ability to turn an image into a 3D printable model has a wide range of fun and practical applications:
- Custom Miniatures: Turn a photo of your pet, your favorite game character, or even yourself into a physical miniature.
- Personalized Jewelry: Convert a sketch or a logo into a unique pendant, earring, or keychain.
- Architectural Models: While not a replacement for professional CAD, you can create quick physical models of buildings or structures from photos.
- Prototyping: Quickly turn a concept sketch of a product into a physical prototype to test its form and ergonomics.
- Art and Sculpture: Create abstract art or sculptures from digital paintings or interesting textures.
- Education: Students can bring their drawings to life or create 3D models of historical artifacts from photos.
Many of these workflows can be enhanced by using an image to 3D model generator and then refining the output with an AI Texture Generator to prepare it for rendering or other applications beyond printing.
FAQ
What is the best AI for turning an image into a 3D model?
It depends on your goal. For the cleanest geometry and character models, Hyper3D is often the top choice. If you need the best possible textures and a great user experience, Meshy AI is fantastic. For game developers who need speed and auto-rigging, Tripo AI is hard to beat.
Can I 3D print a model generated from a single image?
Yes, absolutely. Modern AI tools can infer the full 3D shape from a single 2D image. While providing multiple angles can improve accuracy, a single, clear photo is usually enough to generate a printable STL file.
How much does it cost to convert an image to a 3D model?
Many platforms offer free trials or a certain number of free generations. For example, Tripo AI has a generous free credit system, and Tencent Hunyuan3D offers 20 free generations per day. For heavy use, most services have subscription plans or pay-per-model pricing.
Do I need to know 3D modeling to use these tools?
No. That's the biggest advantage of using AI. These tools are designed for users without any prior experience in 3D modeling software like Blender or ZBrush. You can go from an image to a 3D model with just a few clicks.
What file format is best for 3D printing?
STL is the universal standard for 3D printing. While some tools can export to other formats like OBJ or FBX, STL is the one that is compatible with virtually every slicer software on the market. You can convert between formats using a tool like a GLB-to-USDZ converter, but for printing, STL is your best bet.